About Me

- Tonya
- Hiya I'm Tonya! I'm an avid psper, have been for a few years and finally have me a blog that I've been working on slowly getting stuff added to. I started writing tuts and recently started making masks and templates. I LOVE to see creations you've made with my things, if you'd like to email me please do so at aquaspinner@gmail.com ................................................. My TOU are as follows: All of my items are personal use only NO Commercial Use, please do not share (distribute) my stuff in groups, just send people here to grab please. ♥ Tutorial writers, if you wish to use my stuff in your tutorials, of course I am honored! You're more than welcome to use my stuff in them, I only require that you link to me and send people here to grab the goodies that you are using in the tut. ................................................. Hope you'll enjoy what I have for ya and thanks for stopping by. ♥
Cluster Frame TOU
Thank you SO much for being so interested in my cluster frames. I love that you enjoy using them.
However I do have a request, please do NOT credit me as the cluster frame on your tags. Although I assembled it, I do not believe I deserve any such credit. If anything, please list Scrapkit by, (assuming you didn't add other bit by a different designer to your tag of course). I'd prefer not be given credit for simply assembling the cluster frame. Thank you ♥
Followers
Sunday, October 25, 2009
This is the tag we'll be making, it's very simple, I nearly didn't write a tut but if you're looking for something quick and easy this is it! So, here's what you'll need:
• Sugar Cookies scrapkit available for purchase at Nitwit Scraps. However, you can find a FTU if you wish not to purchase the kit. There are lots of Christmas its out there that have the bauble frame in kits.
• Tube I used was by Jennifer Janesko and is available for purchase at CILM, but any tube will do also.
• Mask I used was WSL 259 available at Weescotslass site for download (I think I've used nearly every mask there lol, they are gorgeous ones!)
• Filters I used were Xero Porcelain and Eye Candy 4000 Glass.
• Font used was Cupiedoll, sorry it is a pay font so I'm unable to provide it..
Okay ready, let's go!
1. Open up a blank canvas with a white background. I like to use a starting size of 700 x 700, but that is just a preference. We will be re-sizing later.
2. Open up the scrap bits you wish to use. I then re-size the DPI on them, as it's important that if you are using PTU tubes, you may not exceed 72 DPI. I tend to re-size each item before putting on my tag, so I don't need to worry about it later. If you do not know how to re-size the resolution, check on my tips and tricks board and you'll see an easy peasy way to do that.
3. Okay lets start with using the bauble frame, if using the kit I did it's tag_frame_maryfran and I re-sized the size of it to about 35%.
4. Now see how the inside is transparent? Let's put a paper background in there! I used paper titled bg_sparklestan_maryfran for this one. It gave it a nice subtle background I thought. So take your magic wand tool, click inside that transparent area, expand by ohhh 10 and then invert your selection. Paste in that paper below that frame. Now as nitwits kits are full-sized, and not tagger-sized, I always re-size the papers 20%. Otherwise them sprinkles look like whole cookies! Once happy with the size, hit delete to remove everything but that circle we wanted to fill. Looks nice huh? DO NOT DE-SELECT.
5. Okay let's move on to place our tube in there as we still have our selection going to save some time. I took my tube and pasted as a new layer above the paper and below the frame. So it looks all nice and pretty in there, you may need to re-size your tube a little, depending on which tube you chose to use. Once happy de-select now. Now what I did is 'smoosh' down the frame just a tiny little bit, otherwise it's just a tad too long. Don't do too much though otherwise the bauble looks strange. Just use your deform too on the frame and smoosh the top middle down a little.
6. Okay now let's add our background for behind the fame. Click so that you are on your white background layer. Then paste a paper, I used bg_ltgreendots_maryfran for this one, but whatever works best for you. Again re-size 20% otherwise the dots are not so little hehe! Then I applied my mask, in this tut I used WSL_259, but that's also a preference of course. Once you've applied it, I re-sized about 70%. I did this so that it's just enough behind the roundness of the bauble frame. Once happy, merge layer group for the mask layer.
7. Alright now let's re-size the entire tag to make it be whatever size you'd like your finished product. I cropped all that excess white stuff off first and then I think I re-sized all 70%, but whatever you want it to be.
8. Click on your tube layer and sharpen (Adjust, Sharpness, Sharpen). I always sharpen after re-sizing my tag to keep the tube looking crisp. Feel free to sharpen any other bits of it you wish. Then I also applied the Xero Porcelain filter to the tube. I like to do that with the tube because it seems to make the tube stand out just a tiny bit and gives it a nice soft glow to it as well.
9. Okay now you want to add your copyright and watermark. Always want to give the credit to that artist.
10. Okay almost done! Just gotta do your text, this is painless I promise. Go and choose your font settings, I chose Cupiedoll and size 100, stroke width of 2.5, kerning 0 and no bolding, but always use what you want of course, we all have our fave fonts. :D Oh and I used #9c301e for the color of the text.
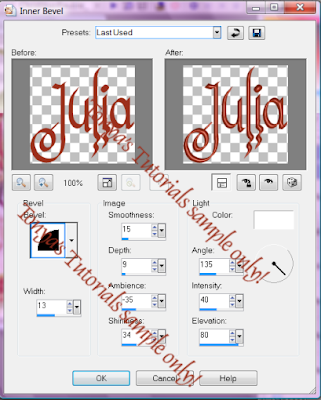
11. Now for my effects, what I did was applied a nice inner bevel first, here are the settings that I chose to use:

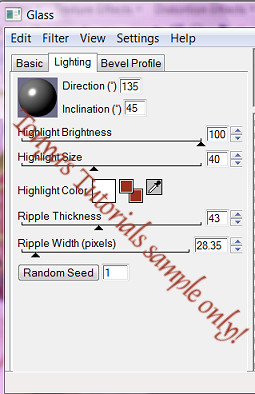
Then I want to make it nice and pretty shiny, so I chose to use Eye Candy 4000 glass to do this on the inner bevel. I used the following settings:

and the third tab I just used the "Mesa" setting.
Then just apply a drop shadow of your choice, I used: 0, 0, 75, 8 and same color as my text.
This tutorial was written by Tonya on December 6, 2008 and absolutely no part of this tutorial may be taken or used without my expression permission.
Labels:PTU Tutorials
Subscribe to:
Post Comments
(Atom)
Labels
- CDO (1346)
- Wallpapers (756)
- Timeline Set (395)
- CDO Bonus Tube (264)
- Dees'Sign Depot (231)
- Ladyhawwk Designs (226)
- Verymany (174)
- Tasha's Playground (138)
- Chichi Designz (135)
- CDO CT (130)
- Barbara Jensen (126)
- Foxys Designz (126)
- FTU Cluster Frames (120)
- Snag Sets (118)
- Hungry Hill (117)
- Honored Scraps (107)
- Rebel Dezigns (106)
- CDO Scrap CT (87)
- Gimptastic Scraps (82)
- Animated (72)
- Karmalized Scraps (72)
- Rebecca Sinz (62)
- Gothic Inspirations (56)
- Freebie (55)
- Chaos Priestess (54)
- CDO Scrapkit Bundles (52)
- Kissing Kate (46)
- Rieneke Designs (43)
- PTU Tutorials (42)
- Gradients (36)
- PTU Clusters (34)
- Zindy Nielsen (32)
- Templates (29)
- A Space Between (25)
- CDO Retired Bonus (25)
- Mystical Scraps (24)
- Creative Scraps by Crys (23)
- FTU Tutorials (22)
- CDO Collab Kits (20)
- Keith Garvey (20)
- Masks (20)
- Kizzed by Kelz (19)
- CDO Diamond Club (17)
- Forum Set (15)
- Scrappin' Krazy Designs (12)
- Doodle by Design (11)
- Schnegge Scraps (11)
- Special Note (11)
- AoRK (10)
- Birthstone Series (10)
- Monti's Scraps (10)
- Christmas (9)
- Treasured Scraps (9)
- No Scraps Tutorials (8)
- Whisprd Dreamz (8)
- Zlata M (8)
- CDO Scrap Collab (7)
- Digital Art Heaven (7)
- Pink Paradox Productions (7)
- CT Collabs (6)
- Dark Yarrow (6)
- Sophisticat Simone (6)
- TK Dezigns (6)
- Layouts (5)
- Textures (5)
- CDO Exclusive Tube (4)
- Creative Misfits (4)
- Irish Princess Designs (4)
- LML Designs (4)
- Curious Creative Dreams (3)
- Dance in the Rain (3)
- Freeks Creations (3)
- Raspberry Road (3)
- Awards (2)
- CDO Cluster Packs (2)
- Mellie's Beans (2)
- Scrapkits (2)
- Thank You! (2)
- Wicked Princess Scraps (2)
- sylly creationz (2)
- 'how to' tutorials (1)
- Blinkies (1)
- CDO Animation Collab (1)
- TOU (1)
Leave Some Lovin'
Search This Blog
Blog Archive
-
►
2020
(187)
- ► November 2020 (19)
- ► October 2020 (17)
- ► September 2020 (26)
- ► August 2020 (19)
- ► April 2020 (14)
- ► March 2020 (22)
- ► February 2020 (18)
- ► January 2020 (15)
-
►
2019
(178)
- ► December 2019 (17)
- ► November 2019 (20)
- ► October 2019 (10)
- ► September 2019 (15)
- ► August 2019 (8)
- ► April 2019 (18)
- ► March 2019 (16)
- ► February 2019 (13)
- ► January 2019 (18)
-
►
2018
(263)
- ► December 2018 (16)
- ► November 2018 (27)
- ► October 2018 (22)
- ► September 2018 (17)
- ► August 2018 (19)
- ► April 2018 (23)
- ► March 2018 (28)
- ► February 2018 (21)
- ► January 2018 (24)
-
►
2017
(253)
- ► December 2017 (11)
- ► November 2017 (16)
- ► October 2017 (23)
- ► September 2017 (15)
- ► August 2017 (22)
- ► April 2017 (28)
- ► March 2017 (21)
- ► February 2017 (33)
- ► January 2017 (25)
-
►
2016
(342)
- ► December 2016 (28)
- ► November 2016 (27)
- ► October 2016 (30)
- ► September 2016 (23)
- ► August 2016 (25)
- ► April 2016 (31)
- ► March 2016 (27)
- ► February 2016 (32)
- ► January 2016 (29)
-
►
2015
(362)
- ► December 2015 (35)
- ► November 2015 (43)
- ► October 2015 (29)
- ► September 2015 (27)
- ► August 2015 (34)
- ► April 2015 (31)
- ► March 2015 (31)
- ► February 2015 (22)
- ► January 2015 (25)
-
►
2014
(150)
- ► December 2014 (18)
- ► November 2014 (20)
- ► October 2014 (14)
- ► September 2014 (10)
- ► August 2014 (11)
- ► April 2014 (12)
- ► March 2014 (13)
- ► February 2014 (14)
- ► January 2014 (8)
-
►
2013
(37)
- ► December 2013 (3)
- ► November 2013 (6)
- ► October 2013 (3)
- ► September 2013 (2)
- ► August 2013 (4)
- ► April 2013 (1)
- ► February 2013 (2)
- ► January 2013 (4)
-
►
2012
(8)
- ► December 2012 (2)
- ► October 2012 (1)
- ► March 2012 (1)
- ► February 2012 (2)
- ► January 2012 (1)
-
►
2011
(20)
- ► December 2011 (4)
- ► November 2011 (2)
- ► April 2011 (1)
- ► March 2011 (3)
- ► February 2011 (2)
- ► January 2011 (3)
-
►
2010
(42)
- ► November 2010 (1)
- ► October 2010 (1)
- ► September 2010 (5)
- ► August 2010 (2)
- ► April 2010 (3)
- ► March 2010 (4)
- ► February 2010 (5)
- ► January 2010 (16)


LOVES!!!!!!!!!!!!!!!
ReplyDelete