About Me

- Tonya
- Hiya I'm Tonya! I'm an avid psper, have been for a few years and finally have me a blog that I've been working on slowly getting stuff added to. I started writing tuts and recently started making masks and templates. I LOVE to see creations you've made with my things, if you'd like to email me please do so at aquaspinner@gmail.com ................................................. My TOU are as follows: All of my items are personal use only NO Commercial Use, please do not share (distribute) my stuff in groups, just send people here to grab please. ♥ Tutorial writers, if you wish to use my stuff in your tutorials, of course I am honored! You're more than welcome to use my stuff in them, I only require that you link to me and send people here to grab the goodies that you are using in the tut. ................................................. Hope you'll enjoy what I have for ya and thanks for stopping by. ♥
Cluster Frame TOU
Thank you SO much for being so interested in my cluster frames. I love that you enjoy using them.
However I do have a request, please do NOT credit me as the cluster frame on your tags. Although I assembled it, I do not believe I deserve any such credit. If anything, please list Scrapkit by, (assuming you didn't add other bit by a different designer to your tag of course). I'd prefer not be given credit for simply assembling the cluster frame. Thank you ♥
Followers
Tuesday, April 20, 2010
This is the tag we'll be making and what you'll need:
• Annegret scrapkit made by the very talented Seven it is available for purchase at her store.
• I used a tube I had purchased of Jamie Kidd's which I purchased at CILM. Please do not use this artist's work without a proper license to do so. CILM is now closed, and you can now purchase her art tubes at CDO here.
• Template I used was by Rose go to blog to get it. The Daydreamer temp is 2nd one down. Thank you so much Rose!
• I used a mask 51 from Magsnificiant Creations blog, please check out the masks there, they are awesome!
• Filters I used were Tramages Cirquelate, Eye Candy 4000 Gradient Glow, Super Blade Pro (coconut ice setting), Eye Candy 5 Impact Perspective Shadow, Xero Porcelain, Filter Factory E Mo' Jellyfish.
• Font used was Adagio Pro which I cannot share, but any font of your choice will work nicely.
Okay ready, let's go, this will be really easy I promise!
• Open up Rose's fab template, and delete Raster 7 as it's not needed. Change Canvas Size to 600 x 600 so we've got lots of space to work around in. You may need to floodfill the bottom (Raster 6 layer) white again. Just gives us plenty of space to see what we are doing. If you are using a PTU tube it is very important you change the overall image to be no more than 72 DPI. This is in accordance with the TOU that each of the PTU agencies impose. To do this, go to re-size, uncheck the "resample using" box mine is in the middle of the page, depends on which version of PSP you are using. Change the resolution to 72 and press OK. Alright now let's start and do what we need to with our layers lol, we'll work from the bottom up.
• On Raster 2 layer, let's colorize that to match whatever your tag colors are going to be, I chose to make that layer a darker purple. It doesn't show much but it depends on how you decorate your template as to what will show. Using the manual color correction tool, I selected a color from the first (current) image as the source and chose a dark purple color as the target. You can see a preview of what it will look like in that window so you can fine tune as need be. When happy click OK.
• On Raster 1 layer, the semi circle, I selected all, float, and defloat, added a new blank layer and paste paper of choice (I used paper 11) into selection in that new layer. Select none and delete the original Raster 1 layer. While on that new layer you just created with that paper, go ahead and apply Tramages Cirquelate to that layer. It's important to have your background color a darker green of that paper, I used code #b0ce94.
• On Raster 5 layer, using your deform tool (or pick whichever you prefer). Move that layer down just a smidge so that it is flush with the edge of the noise layer (you won't see any of that green layer beneath it). Also you will need to stretch the side on each just a few pixels as there might be a space or two of the green showing beneath. I applied Filter Factory E Mo' Jellyfish to this layer just to give it some definition. I changed tile size to about 223 or so, totally style preference though, whatever you like on it.
• On Raster 4 layer, you may need to move this down some so that it is centered on that raster 5 layer. I changed the color of the Daydreamer text from white to a light purple (I used #d9aedf) using the manual color correction tool like before. We will do more with this layer but we need to do other stuff first lol.
• On Raster 3 layer, I changed the color of the butterfly doodle from the purple to a light green using the manual color correction tool. Select the current purple color as the source and a light green as target color. Select all, float, and defloat, apply Super Blade Pro Coconut Ice setting and select none. Now our temp starting to look pretty yes? But let's make the tag look gorgeous.
• I opened up the pretty flower #3 from the kit and paste as a new layer above the green semi-circle that you applied the Cirquelate filter to. I re-sized the flower to about 60% and moved over to the left hand side, right about where the text Daydreamer starts. Duplicate and move up and to the right a little so that the next one is just up a little on that semi-circle. Continue to do this until you have them all the way around. I ended up with a total of 6 of them. I applied a drop shadow using Eye Candy 5 Perspective Shadow to each of the flower layers. Here's a pic of what my settings looked like:
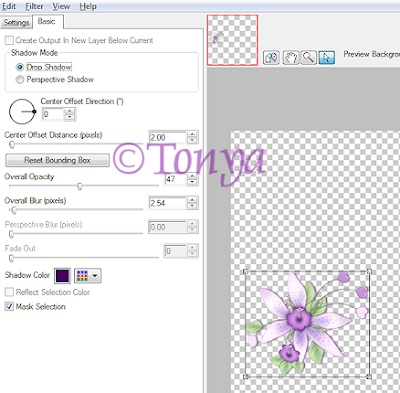
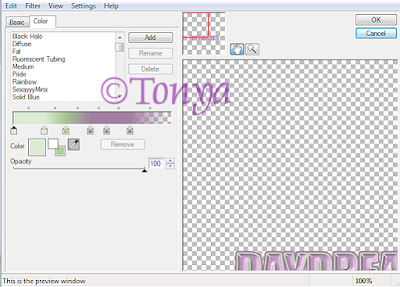
Once happy with all of them, start with the top most flower layer and merge down until all of the flowers are on one layer. Select all, float, defloat, contract selections by 1 and now go back up to the Raster 4 layer and using your eraser tool erase the parts of the Daydreamer text that the flowers hang over on. Do the same on the Raster 5 layer (the purple strip beneath the Daydreamer text). Now back on the Raster 4 layer (Daydreamer text) select all, float, defloat, and apply Super Blade Pro Coconut Ice setting to the Daydreamer text and once that is done select none. Now I applied a slight gradient glow using Eye Candy 4000. Here's what my settings looked like (first panel is settings of 5, 25, 100).
• Back on the flowers layer, add your tube as a new layer. We want this to be above the flowers layer but below the Raster 5 layer. This is a great template for use on those half body images. Re-size and position where need be.
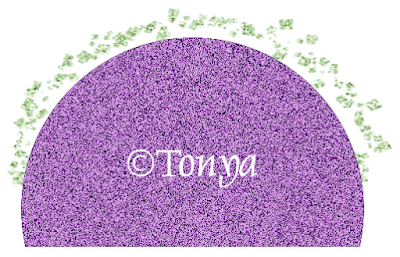
• On the white background layer (beneath the purple glitter layer) and paste the glitter frame 5 as a new layer. Using your deform (or pick) tool, drag it so it fits around the top of the purple glitter layer nicely. Don't worry about how the bottom looks we'll fix that! Using your selection tool (set on rectangle) draw from where your where your purple rectangle and Daydreamer text are all the way across so that you have the bottom half of the glitter frame and once happy press delete. This is what it looks like to give you and idea.
• On white background layer again, select all, add a new blank layer and paste paper of choice in that new layer. I used paper 21. Apply mask 51 as linked above and merge layer group, duplicate and mirror the images, merge down those 2 masked layers together. Do any re-sizing or moving with your deform tool as need be.
• At this point re-size your total tag to what you want your ending tag size to be and sharpen any layers that need it and apply any drop shadows as need be. On the tube layer, I applied Xero Porcelain and then the drop shadow that I used on the flowers which gave her a nice glow. Apply your artist © information and tagger's watermark. I also applied a very light gradient glow to these layers so that they stood out more. I always try to put the © info right on the tag itself to protect the information.
• Add a new layer and do your text. I used the font Adagio Pro in white and applied a pretty lime green super blade pro preset and then a nice gradient glow with drop shadow. Use whatever your preferences are for text, those are just what I used but that is all just personal preference. Once done with text, hide the white background layer and save your tag as a png and voila all done!
This tutorial was written by Tonya on April 21, 2010 and absolutely no part of this tutorial may be taken or used without my express permission. Any similarities to any other tutorial is purely coincidental.
Labels:CDO,PTU Tutorials | 0
comments
Saturday, April 3, 2010
This is the tag we'll be making so, here's what you'll need:
• Tube I used is by Lorenzo DiMauro which I purchased at his site please do not use this tube if you do not have an appropriate license to do so! This tube is in honor of my good friend Raqual and I wanted to do a tag and tut with it that would help get the important message to GET SMOOSHED!
• Mask I used was from Creative Misfits blog, you can get it here I used KyLie_Mask_mf01.
• I used a template by Punky Butts and you can get it here, I used template 49.
• I love filters lol, so here's what I used: Super Blade Pro (coconut ice setting), Xero Porcelain, DSB Flux Bright Noise, Eye Candy 4000 Gradient Glow, Eye Candy 5 Perspective Shadow, Tramages Tow the Line, Filters Unlimited 2 (used paper texture Wallpaper Fine, but any texture effect of choice will do if you don't have the filter).
• Gradient of choice, I used PinksHaveIt_CC.
• Fonts used were Black Rose and Harmonica, unfortunately Harmonica is pay so I cannot provide that one, but use whatever font you like.
Okay ready, let's go, this will be fun and easy!
• Open up Punky Butts fab template, duplicate the image and close out the original. Delete layers of Credits, Wordart Frame, Wordart, and dots, as pretty as they are, I ended up not using them. Turn visiibility of background layer on and I increased canvas size so it gave me more room to work and I could see what I was doing better. I changed my size to 850 x 650 lol I know that seems huge but we will re-size and crop and all that good stuff later. Okay now let's work from the bottom up on this fab template.
• On Strip layer, change that to a pink color that matches your tube, below is a screen shot of what mine looked like. After changing the color, I applied Filters Unilimted Paper Textures Wallpaper Fine. If you don't have the filter just use a different texture effect of choice (under Effects, Texture Effects, Texture). I then applied a very slight gradient glow using the filter Eye Candy 4000 using black and the pink I'd changed my Strip to. See my tag as an example.
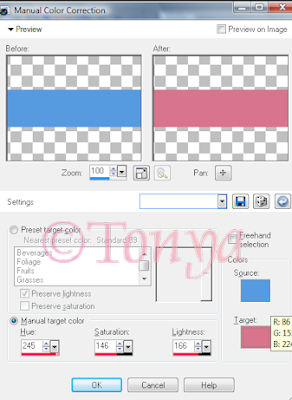
• Hearts2 layer, using manual color correction tool again, I changed the color to the pink color I had changed the strip too, just change the source color from the blue to the pink color the hearts currently are. Once done, select all, float, defloat and apply Super Blade Pro coconut ice setting. If you don't have that filter, you can apply a nice inner bevel instead. After applying the SBP filter, I applied a gradient glow, just a nice subtle one like on the Strip layer. Repeat these same steps with the Hearts 1 layer.
• Heart right layer, select all, float, defloat, add a new layer, I contracted the selection by 2 and flood filled with the gradient I chose to use. Select none and delete original Heart right layer, leave selections active. Let's go and paste the tube as a new layer now as long as we still have our selections. I didn't do any re-sizing on it and once happy with the position of the tube, invert your selections and press delete. I changed the blend mode to Luminance (Legacy). Select none and on the heartframe right layer, I used manual color correction tool to change to a pretty pink color, my target was #d9748d and applied an inner bevel of choice. Repeat these same steps on Heart left layer, I just had a different part of the tube as the focal on this one. See my tag for reference.
• Circle layer, before we do much modification to it lol, lets get our tube in there nicely. select all, float, defloat, invert selection, contract selection by 1. Paste tube as a new layer, re-size if you need to at all and once happy with placement, grab eraser tool and erase and part that hang over the circle on the bottom. Select none. Now click on the blue in that layer and I used manual color correct to change the color to one that matches the tag. Leaving selection active, I applied Filters Unlimited Paper Texture Canvas Fine. If you do not have that filter, you should be able to achieve similar pretty effect using the texture effects within psp. Select none. Now select the black area of the circle using your magic wand tool and apply Tramages To the Line, I just used the default settings. However I wanted to make them lines pink lol! So leaving selections as is, I zoomed in a bit and applied manual color correction. Reason for zooming in a bit is to easier select the color of those gray lines as the source, and the target be a pink color from my tag. See screen shot below for example. Select none when done with that and then I applied a gradient glow around the whole layer using the pink and black.
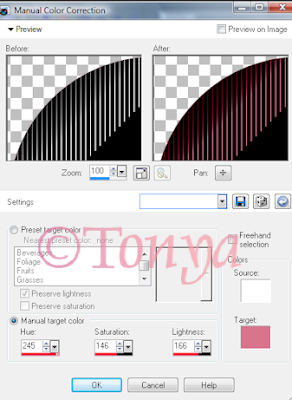
• Lil hearts top layer, using the manual color correction tool, I changed them to match the dominant mauve color I've been using in the tag. Once done to your liking, select all, float, defloat, and I applied Super Blade Pro coconut ice and then apply gradient glow as used before. Now we've got our template basically done, let's pretty it up with some minor effects, we're almost done woohoo!
• On the background layer, add a new layer, and flood fill with the gradient of choice you are using for this tag. Apply KyLie's gorgeous mask and once happy merge layer group. Do any re-sizing if need be of the mask layer. At this point I also cropped any of the excess and also re-size your tag to what you want your ending size to be. Sharpen any layers that need it. I applied Xero Porcelain to the main tube layer, using the default settings. Apply drop shadows to your layers at this point, I like to drop shadow pretty much every layer lol. I used Eye Candy 5 Perspective Shadow but if you don't have that filter the drop shadow in psp will work beautifully as well.
• Back up to the top of the layers, I added a new layer and typed the text "Get Smooshed" in place of the original wordart that came with the template. In light of the pink ribbon on the tube, I wanted to add an important message for this tag. I used the font Black Rose and once happy with placement, I applied DSB Flux Bright Noise, intensity set at 39, and Mix selected as well I applied a nice subtle gradient glow to the words to make them pop out a bit and a blurry drop shadow.
• Add the artist's copyright information and your tagger's watermark to the tag. All that is left is to do your text. I used Harmonica font using the gradient I had used in the tag previously and applied Super Blade Pro coconut ice and gradient glow and of course a nice blurry drop shadow. Close off the white background layer if you prefer transparent backgrounds and save as a png and voila all done, I hope you've enjoyed this tutorial.
This tutorial was written by Tonya on April 3, 2010, absolutely no part of this tutorial may be taken or used without my express permission. Any part that may be similar to any tutorial is purely coincidental and unintended.
Labels:FTU Tutorials,No Scraps Tutorials | 0
comments
Thursday, April 1, 2010
This is the tag we'll be making so, here's what you'll need:
• Tube I used was by Edward Reed which I purchased at CILM however he now sells his art at MPT and may only be used with appropriate license, please do not use this tube if you do not have a license to do so. Another update - he now sells at CDO you can purchase this tube here.
• Mask I used was from Creative Misfits blog, you can get it here I used KyLie_Mask_mf01.
• I used the scrapkit by Kim available also on the Misfits blog here.
• Frame I used was by Ivy's Inspirations and you can get it here I used frame 1. Her site is no longer online boohoo so here is a link to get the frame
• I love filters lol, so here's what I used: Super Blade Pro (coconut ice setting), Xero Porcelain, Xero Mistifier, Andrews 10 Revolving Door, Eye Candy 4 Gradient Glow, Eye Candy 5 Perspective Shadow.
• Font used was Jayne Print, but use whatever font you wish.
Okay ready, let's go, this will be fun and easy!
• Open up new image 700 x 700, with white background, we can crop and re-size later as needed. Paste frame as a new layer, re-sizing as need be, I re-sized by 25%. Using your selection tool (set on rectangle) draw a selection within the bottom rectangle, the pink one, add a new layer undearneath the frame. You should have a selection that will cover that whole inside of the frame that way. Paste paper of choice into selection on that new layer you just added. I used paper 7 it had such pretty colors had to use it! With your selection still active, apply a gaussian blur of 5 and apply Andrews 10 Revolving Door with the default settings. Select none.
• On white background layer, add new layer, select all, and paste paper of choice into selection on that new layer. I used paper 7 again and applied gaussian blur of 5 again too. Apply mask and if happy with it merge layer group. I resized mine by 95% and moved just a smidge, needed to have it more centered with the frame.
• Add tube of choice to your pretty tag and any elements you like to have on it. Re-size your tag to what you want your ending tag size to be. Sharpen any layers that need it and also apply any drop shadows. I used Eye Candy 5 Perspective Shadow, however if you don't have it, drop shadow in PSP works just as great. On the frame I applied Xero Mistifier, just softened it up a lil bit, totally a personal preference of course. I also applied Xero Porcelain to the tube layer, gives it a pretty glow. I used just default settings on both filters.
• Time to do our text! What I did is on the layer underneath the frame (the one we applied the Andrews filter to), copy and paste as a new image, which gives you a pattern in your material palette. Choose your font and go to your material palette, have it set to pattern and find the pattern you just pasted as a new image. Type your text and on mine I applied Super Blade Pro coconut ice setting, adding a slight gradient glow using colors from my tag and of course a nice blurry drop shadow. Now all that's left is to add the artist's copyright and your tagger's watermark, hide your white background if you don't want it visible, save as a PNG and voila you're done!
This tutorial was written by Tonya on April 1, 2010, absolutely no part of this tutorial may be taken or used without my express permission. Any part that may be similar to any tutorial is purely coincidental and unintended.
Labels:CDO,FTU Tutorials | 1 comments
Subscribe to:
Posts
(Atom)
Labels
- CDO (1346)
- Wallpapers (756)
- Timeline Set (395)
- CDO Bonus Tube (264)
- Dees'Sign Depot (231)
- Ladyhawwk Designs (226)
- Verymany (174)
- Tasha's Playground (138)
- Chichi Designz (135)
- CDO CT (130)
- Barbara Jensen (126)
- Foxys Designz (126)
- FTU Cluster Frames (120)
- Snag Sets (118)
- Hungry Hill (117)
- Honored Scraps (107)
- Rebel Dezigns (106)
- CDO Scrap CT (87)
- Gimptastic Scraps (82)
- Animated (72)
- Karmalized Scraps (72)
- Rebecca Sinz (62)
- Gothic Inspirations (56)
- Freebie (55)
- Chaos Priestess (54)
- CDO Scrapkit Bundles (52)
- Kissing Kate (46)
- Rieneke Designs (43)
- PTU Tutorials (42)
- Gradients (36)
- PTU Clusters (34)
- Zindy Nielsen (32)
- Templates (29)
- A Space Between (25)
- CDO Retired Bonus (25)
- Mystical Scraps (24)
- Creative Scraps by Crys (23)
- FTU Tutorials (22)
- CDO Collab Kits (20)
- Keith Garvey (20)
- Masks (20)
- Kizzed by Kelz (19)
- CDO Diamond Club (17)
- Forum Set (15)
- Scrappin' Krazy Designs (12)
- Doodle by Design (11)
- Schnegge Scraps (11)
- Special Note (11)
- AoRK (10)
- Birthstone Series (10)
- Monti's Scraps (10)
- Christmas (9)
- Treasured Scraps (9)
- No Scraps Tutorials (8)
- Whisprd Dreamz (8)
- Zlata M (8)
- CDO Scrap Collab (7)
- Digital Art Heaven (7)
- Pink Paradox Productions (7)
- CT Collabs (6)
- Dark Yarrow (6)
- Sophisticat Simone (6)
- TK Dezigns (6)
- Layouts (5)
- Textures (5)
- CDO Exclusive Tube (4)
- Creative Misfits (4)
- Irish Princess Designs (4)
- LML Designs (4)
- Curious Creative Dreams (3)
- Dance in the Rain (3)
- Freeks Creations (3)
- Raspberry Road (3)
- Awards (2)
- CDO Cluster Packs (2)
- Mellie's Beans (2)
- Scrapkits (2)
- Thank You! (2)
- Wicked Princess Scraps (2)
- sylly creationz (2)
- 'how to' tutorials (1)
- Blinkies (1)
- CDO Animation Collab (1)
- TOU (1)
Leave Some Lovin'
Search This Blog
Blog Archive
-
►
2020
(187)
- ► November 2020 (19)
- ► October 2020 (17)
- ► September 2020 (26)
- ► August 2020 (19)
- ► April 2020 (14)
- ► March 2020 (22)
- ► February 2020 (18)
- ► January 2020 (15)
-
►
2019
(178)
- ► December 2019 (17)
- ► November 2019 (20)
- ► October 2019 (10)
- ► September 2019 (15)
- ► August 2019 (8)
- ► April 2019 (18)
- ► March 2019 (16)
- ► February 2019 (13)
- ► January 2019 (18)
-
►
2018
(263)
- ► December 2018 (16)
- ► November 2018 (27)
- ► October 2018 (22)
- ► September 2018 (17)
- ► August 2018 (19)
- ► April 2018 (23)
- ► March 2018 (28)
- ► February 2018 (21)
- ► January 2018 (24)
-
►
2017
(253)
- ► December 2017 (11)
- ► November 2017 (16)
- ► October 2017 (23)
- ► September 2017 (15)
- ► August 2017 (22)
- ► April 2017 (28)
- ► March 2017 (21)
- ► February 2017 (33)
- ► January 2017 (25)
-
►
2016
(342)
- ► December 2016 (28)
- ► November 2016 (27)
- ► October 2016 (30)
- ► September 2016 (23)
- ► August 2016 (25)
- ► April 2016 (31)
- ► March 2016 (27)
- ► February 2016 (32)
- ► January 2016 (29)
-
►
2015
(362)
- ► December 2015 (35)
- ► November 2015 (43)
- ► October 2015 (29)
- ► September 2015 (27)
- ► August 2015 (34)
- ► April 2015 (31)
- ► March 2015 (31)
- ► February 2015 (22)
- ► January 2015 (25)
-
►
2014
(150)
- ► December 2014 (18)
- ► November 2014 (20)
- ► October 2014 (14)
- ► September 2014 (10)
- ► August 2014 (11)
- ► April 2014 (12)
- ► March 2014 (13)
- ► February 2014 (14)
- ► January 2014 (8)
-
►
2013
(37)
- ► December 2013 (3)
- ► November 2013 (6)
- ► October 2013 (3)
- ► September 2013 (2)
- ► August 2013 (4)
- ► April 2013 (1)
- ► February 2013 (2)
- ► January 2013 (4)
-
►
2012
(8)
- ► December 2012 (2)
- ► October 2012 (1)
- ► March 2012 (1)
- ► February 2012 (2)
- ► January 2012 (1)
-
►
2011
(20)
- ► December 2011 (4)
- ► November 2011 (2)
- ► April 2011 (1)
- ► March 2011 (3)
- ► February 2011 (2)
- ► January 2011 (3)
-
▼
2010
(42)
- ► November 2010 (1)
- ► October 2010 (1)
- ► September 2010 (5)
- ► August 2010 (2)
- ► March 2010 (4)
- ► February 2010 (5)
- ► January 2010 (16)
-
►
2009
(23)
- ► December 2009 (8)
- ► November 2009 (4)
- ► October 2009 (11)


