About Me
- Tonya
- Hiya I'm Tonya! I'm an avid psper, have been for a few years and finally have me a blog that I've been working on slowly getting stuff added to. I started writing tuts and recently started making masks and templates. I LOVE to see creations you've made with my things, if you'd like to email me please do so at aquaspinner@gmail.com ................................................. My TOU are as follows: All of my items are personal use only NO Commercial Use, please do not share (distribute) my stuff in groups, just send people here to grab please. ♥ Tutorial writers, if you wish to use my stuff in your tutorials, of course I am honored! You're more than welcome to use my stuff in them, I only require that you link to me and send people here to grab the goodies that you are using in the tut. ................................................. Hope you'll enjoy what I have for ya and thanks for stopping by. ♥
My Artist CTs ♥

My CTs ♥



My Guest CTs ♥


Monday, June 21, 2010



• Tube I used was by Caron Vinson which I purchased from CILM. Please do not use her art without an appropriate license to do so. CILM is now closed, you can now purchase Caron's amazing art at CDO here.
• Mask I used was from Melissa, you can get it here I used mask 14.
• I used the scrapkit by Angela of Bastel Galaxy called Autumn Dreams please go to her blog to find out purchasing options.
• Filters I used were: Xero Nostalgia, Xero Soft Vignette, Xero Porcelain, Super Blade Pro, Eye Candy 4000 Gradient Glow, and Eye Candy 5 Perspective Shadow.
• Font used was Mon Amour script Pro, but use whatever font you wish.
Okay ready, let's go, make a fab tag!
• Open up a new blank canvas of 700x700, if you are using PTU art, be sure that your resolution is at 72 dpi in accordance with the PTU companies TOU. Paste frame 4 as a new layer and re-size to your liking. The frame is gorgeous but as my friend Raq lovessssss sunflowers, I decided to put sunflowers over the flowers on the frame. Using flower 10, I pasted on top of frame, for the smaller flowers I re-sized by 30% and for the bigger ones it was by 50%. Just arrange them to your liking, see my tag for reference.
• Click inside the frame with your magic wand tool and expand your selections by 10. Add a new layer underneath the frame and paste paper of choice (I used paper 13) into selection on the new layer and select none. Now I wanted to lighten it just a little so I went to my effects browser (go to Effects on your toolbar and choose Effects Browser). Click on the Brightness and Contrast folder on the left hand side. It will show you options of what you can choose and I chose Histogram Stretch Factory Default as shown in my example below, then just click Apply.

• Let's put our tube in there. Back on the frame layer, click inside the frame and invert selections, contract your selections by 1. Paste tube on top of frame and position how you want on the tag. I had mine on top of frame but under the sunflowers I added to the frame as explained above. Once happy, grab your eraser tool and erase the bits hanging over the frame you don't want showing. Once complete select none.
• On the paper layer underneath the frame, paste tube as a new layer and arrange to liking so you see her on the right side under the tube and then duplicate and mirror and merge down so that the 2 tube layers are on one layer. (See my tag for reference of how to have it look.) On paper layer, select all, float, defloat, invert selections and on the double tube layer, press delete. On that tube layer, I applied Xero Nostalgia and then Xero Soft Vignette and then moved the opacity down to about 40. On the paper layer, I applied Xero Porcelain just to soften the paper up a little.
• On white background layer, select all, add a new layer, and paste paper of choice (I used paper 10) into selection on the new layer. Select none and apply Melissa's mask 14 and merge layer group. I re-sized the mask layer by 85% and arranged to make it fit nicely behind the frame.
• Add your elements of choice here. I added a doodle above the masked layer, re-sizing and duplicated a few times arranging to however you want to do that. I also added a bow and one of the pendants, this part is all your own preference on how you want your tag to come out. After that's done, I did my cropping and re-sizing of the tag to have it be the final tag size. Sharpen any layers that need it. On the main tube layer, duplicate and on top copy apply a gaussian blur of 5 and changed blend mode to Overlay. On the original tube layer, I applied Xero Porcelain twice to the tube. At this point add any drop shadows to any layers you want them on. I used Eye Candy 5 Perspective Shadow. If you do not have this filter, just use your fave drop shadow in PSP or other filter.
• Add the artist's copyright and your tagger's watermark. I applied text using the font Mon Amour script Pro using white in material palette and applied Super Blade Pro with yellow setting of choice. If you choose not to use the filter just do whatever effects you like best on tag. I then applied a gradient glow and a drop shadow. Hide the white background layer and optimize as a png. Voila you're all done!
This tutorial was written by Tonya on June 20, 2010, absolutely no part of this tutorial may be taken or used without my express permission. Any part that may be similar to any tutorial is purely coincidental and unintended.
Wednesday, June 16, 2010

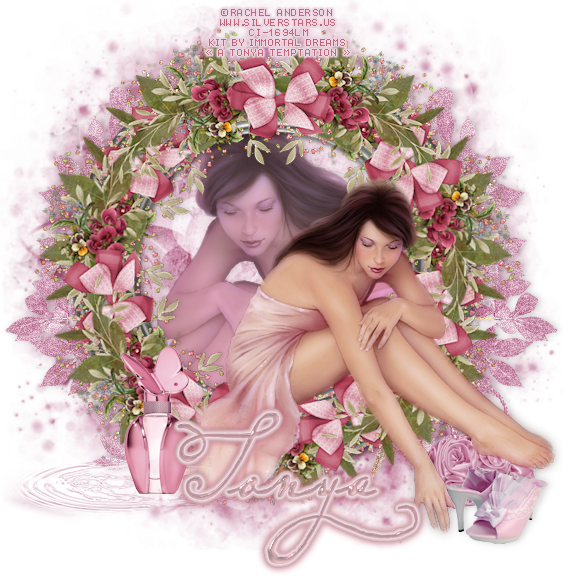
This is the tag we'll be making so, here's what you'll need:
• Tube I used was by Rachel Anderson which I purchased from CILM. Please do not use her art without an appropriate license to do so. CILM is now closed, however you can now purchase Rachel's amazing art at CDO here.
• Mask I used was from Melissa, you can get it here I used mask 10.
• I used the scrapkit by the very talented Missy Lynn of Immortal Dreams called Spilled Purfume and it is available for purchase here.
• Filters I used were: Mura Meisters Copies, Xero Moodlight, Xero Porcelain, Eye Candy 4000 Gradient Glow, Super Blade Pro, and Eye Candy 5 Perspective Shadow.
• Font used was P22 Dearest Swash, but use whatever font you wish.
Okay ready, let's go, make a fab tag!
• Open up a new blank canvas of 700x700 with white background. I know it's big but gives us lots of room to work and we can crop and re-size later as necessary. If you are using PTU art, please make sure that your new image is 72 dpi in accordance with PTU TOU. Copy and paste frame 10 as a new layer, re-size by about 70%. Paste Flower 8 as a new layer, re-size by about 50%, sharpen, and then image flip. Apply Muras Meisters Copies with the following settings:

• Hide the flower frame part for now. With the silver circle frame layer active, using your magic wand tool, click on the outside of the frame (on the blank area), invert your selections and then contract selections by 10. This will easily select all the blank area inside the frame without having it be so tedious for ya lol. On your white background layer, add a new blank layer and paste paper of choice (I used paper 20) into that selection on the new layer. Select none and unhide the flower layer we previously hid.
• Back on white background layer, select all, add a new layer. On your new blank layer, paste paper of choice (I used paper 17) into selection and select none. Apply Melissa's pretty mask and merge layer group if happy with it. While still on the mask layer, I added the leafs element as a new layer. Re-size that layer to your liking and move over to the right so it's just behind the frames. See my tag for reference. Once happy with placing, duplicate and image mirror. I merged down so that the 2 leaf layers were on one and I applied noise with these settings:

• On top of the frames, add your tube and position how you think looks best and re-size as appropriate. Now on the paper layer that is behind the silver frame but above the leafs and mask, paste tube again, don't re-size this time unless of course your tube calls for it lol. Once happy with how she is peaking through the frame, go to the paper layer again and make that layer active. Select all, float, defloat, invert selections and on that paste tube layer hit delete. Select none. Now have that tube layer active again, select all, float, defloat, and below the tube layer add a new blank layer. Flood fill with a matching color from your tube, I used #ddb1b8. Select none. On the tube layer again, duplicate and on the copy (this should be your top tube layer) apply a guassian blur of 5 and change the blend mode to soft light and also change the opacity to 75. Now on the original tube layer, apply Xero Moodlight (screenshot of my settings below) and then change the opacity to 71 on that layer. I also applied Xero Porcelain to this layer as well.

• At this point I cropped and re-sized my tag to what I want the ending tag size to be, leaving a bit of room at the bottom as my font was quite scripty lol. Add any elements you wish to use and add your drop shadows. I used Eye Candy 5 Perspective Shadow, but if you don't have that one, the drop shadow in PSP will work just great too. On the main tube layer, I sharpened, duplicated and applied gaussian blur of 5 to the top copy and changed blend mode to Soft Light. On the original tube layer I applied Xero Porcelain and a drop shadow.
• Add the artist's copyright and your tagger's watermark and all that's left is to do your script. I use a light color from my tube and then did Super Blade Pro (coconut ice setting) and then created a subtle Gradient Glow with Eye Candy 4000 and then of course a blurry darker drop shadow. Hide your white background layer, optimize as a png and voila you're all done! I hope you've enjoyed my tutorial.
This tutorial was written by Tonya on June 16, 2010, absolutely no part of this tutorial may be taken or used without my express permission. Any part that may be similar to any tutorial is purely coincidental and unintended.
Sunday, June 13, 2010

This is the tag we'll be making so, here's what you'll need:
• Tube I used was by Lorenzo DiMauro which I purchased from his site. Please do not use his art without an appropriate license to do so.
• Template I made was by Rosey which you can get at her blog here thank you Rosey Posey!
• Mask I used was from Melissa, you can get it here I used mask 2.
• I used the scrapkit by Bea available here. This kit used to be PTU but is now FTU thank you Bea.
• Filters I used were: Eye Candy 4000 Gradient Glow, Eye Candy 5 Perspective Shadow, Xero Porcelain.
• Font used was Bank Gothic, but use whatever font you wish.
Okay ready, let's go, make a fab tag!
• Open up Rosey's fab template, and as hers is already at 72 dpi no need to change that if you are using a PTU tube. I deleted the credits layer and also the Pixel Words layer as I just ended up not using them in this tag. Okay let's start prettying up this template. On Large Pink Circle layer, select all, float, and defloat, add a new layer and in that new layer paste paper of choice (I used paper 10) into selection on that new layer. Select none and delete the original Large Pink Circle layer. Do the same with the Large White Circle layer, this time I used paper 15.
• On Bottom Right Gray Circle, select all, float, defloat, and paste paper of choice as a new layer (I used paper 11), I re-sized down by 75%, you may need to move the paper over to cover that circle layer. Invert your selections and press delete. If all looks good, select none and delete the original Bottom Right Gray Circle layer. Repeat these same steps with the Top Left Gray Circle layer.
• On Top Right Rectangle layer, select all, float, and defloat and paste paper of choice (I used paper 16) as a new layer. Re-size down a little bit (I re-sized by about 80%), invert your selections. You may need to move the paper you are pasting over a little after re-sizing. Press delete and if happy select none and delete the original Top Right Rectangle layer. Repeat these steps for Bottom Left Rectangle as well.
• On Glitter rectangle, I changed the colors so that it was black instead of the white glitter using the manual color correction tool. Select a whitish color as the source and in the target box change it to black. Or if you prefer other color of course change it to that. You'll be able to see in the preview how it's going to come out so just keep tinkering with it until happy.
• On Left Pink Circle layer, select all, float, defloat and we are going to paste paper of choice as a new layer, but before we do that, the paper I chose (paper 4) I noticed that the black wasn't quite dark enough so on the paper, using my magic wand tool, I selected that dark gray and using my manual color correction tool I changed it to be the dark black color I wanted. It's important to not have the pink dots selected as if we don't it'll change those dots as well. Once happy select none and back on our working canvas then you can copy and paste that adjusted paper as a new layer. I re-sized mine by about 75%, inverted my selections, moved the paper to cover the layer exactly how I wanted and then pressed delete. Select none and delete the original Left Pink Circle layer. Duplicate and mirror this so that it goes over for the other side too and delete the Right Pink Circle layer.
• On Squared Square layer, select all, float, and defloat paste paper of choice (I used paper 11) and re-size to your liking. Invert selections and press delete. I changed blend mode to Dodge on this layer so that you can see those squared effects through the paper and it gives it the coordinating colors of your tag that way. On the Glitter Stars layer, I changed the color from the white to black, just like we did on the Glitter Square layer. Phew! Are template is looking really pretty now I hope?
• Paste tube of choice as a new layer, I paste it above the stars layer, see my tag for reference of appearance. Do any re-sizing if necessary, if using same tube I did, I didn't find it necessary to re-size at all. On your white background layer, add a new layer and I chose to make a gradient using the foreground-background gradient. I used the colors black and #c12f4a. Linear style with an angle of 45 and repeats of 5. Flood fill on your new blank layer and apply Melissa's fab mask (or mask of your choosing if you prefer a different one), merge layer group. At this point I also used my deform tool to pull at the sides to get the effect to show behind the template a little more.
• At this point I re-sized my whole tag by about 90%, as that is what I chose my ending size to be. That's all personal preference though, whatever you like for your tag sizes. I then applied subtle gradient glows to a few of my layers. See my tag for reference. Now decorate with elements from the kit you are using as you like. One note, I used the bling provided and colorized to make it darker but it didn't show up enough so I applied gradient glow to that one as well and I duplicated and flipped so it's above and below the Glitter Square layer. Add your drop shadows, I used Eye Candy 5 Perspective Shadow, but if you don't have the filter, the drop shadow within PSP works just as great.
• Sharpen your tube layer and I duplicated, applied a gaussian blur to the copy and changed blend mode to Soft Light. On the original tube layer, I applied Xero Porcelain, gives a really nice glow to her. Of course drop shadow the original tube as well. Add the artist's copyright and your tagger's watermark at this point. I always do this after re-sizing everything so it's as clear as possible. Sometimes if it doesn't stick out enough I apply a gradient glow to this as well.
• Do your name text now at this point. I used Bank Gothic and just apply all effects you like on your text. Hide the white background layer and save as a png and voila you're all done. I hope you've enjoyed this tutorial.
This tutorial was written by Tonya on June 13, 2010, absolutely no part of this tutorial may be taken or used without my express permission. Any part that may be similar to any tutorial is purely coincidental and unintended.

• Flyaway scrapkit made by the talented Bastelgalaxy, check her blog here for places it's sold at.
• I used 2 tubes I had purchased at Barb Jensen's site. Please do not use this artist's work without a proper license to do so.
• Template 352 I used was by Missy, please go to her blog to get it. Thank you so much Missy!
• I used a mask 2 from Melissa, please check out the masks there, they are awesome!
• Now anyone that has done my tuts knows I LOVE filters, and in this one I used: Mura Meisters Cloud, Super Blade Pro (coconut ice setting), Eye Candy 4000 Glass, Eye Candy 4000 Gradient Glow, Eye Candy 5 Perspective Shadow, and Xero Porcelain.
• Font used was P22 Oh Ley which I cannot share, but any font of your choice will work nicely.
Okay ready, let's go tag something purdy!
• Open up Missy's fabulous template, duplicate the original so that you can re-use again later. I changed the canvas size to 750 x 650 so we've got lots of room to work. Unhide the bottom background and flood fill white again. Delete the credits layer labeled by Missy. As her templates are already in 72 dpi no need to change that even if using PTU tubes woohooo! Okay let's get started!
• On Rectangle layer, select all, float, defloat, invert selections and paste paper of choice as a new layer (I used paper 28) and I re-sized the layer by about 85% and when happy with how it looks, press delete and select none. Delete the original Rectangle layer.
• On Glittered Circle layer, I changed the white color to a dark green color in the kit by using the manual color correction tool. Choosing a lighter color as the source and then on the target you want to have it the color you want it to end in, I chose code of #229e97, but use whatever your preference is for the tag you are making.
• On Large Circle layer, select all, float, defloat, add a new layer and on that new layer paste paper of choice into selection. I used paper 32 and then select none and delete the original Large Circle layer. Do the same with the Med Circle layer, this time I used paper 31. Complete these steps again on the Small Circle layer and that time I used paper 2.
• On Thin Rectangle 1 layer, change the color to a coordinating color in the tag. I changed the pink color to a teal color (code #229e97 again) just like before. I then applied Eye Candy 4000 Glass to this layer with the settings posted below. Do the same steps with Rectangle 2, 3, and 4 with the differing colors on 3 & 4. See my tag for reference.

• The wordart piece, you can colorize these nicely to your liking however you want but I use my magic wand to select as I go. So with your magic wand, I had mine at tolerance about 25 and feather of 0 and selected all of the black text and one exclamation point, once all are selected, I applied Super Blade Pro (coconut ice setting). I found it wasn't as shiny as I wanted so I applied Eye Candy 4000 Glass also with the same settings as above however changed the teal color to be black. You may need to play around with the 3rd tab (bevel profile) settings, use whatever you think works best. Select none. On the pink exclamation point, I used manual color correction to change the pink color to a teal color and also applied Super Blade Pro to that item. With the word "BY" I changed the pink color to a teal color, applied a nice inner bevel setting. Finally on the aqua colored hearts, I changed the color again with manual color correction tool from the aqua (source) to purple (target) and with them still selected, applied Super Blade Pro (once again with the coconut ice setting). Select none and finally, I selected the the white gradient glow that is around all of the text. Once all selected, I applied noise with the following settings:

• Okay now let's put some gradient glow around some of the edges. I applied gradient glow to all my teal layers one like this one posted below. Settings on first tab were 4, 25, 100. Use whatever works best for your tag though. Then on the purple layers, I basically reversed the colors on the gradient glow.

• Okay we gotta do something with those photo frames yet. On the polaroid on left, I used magic wand to select the white portion and then changed the color to a nice purple color using the manual color correction tool. With everything selected yet, I applied Mura Meisters Cloud with the following settings:
Select none if happy and then do the same with the other polaroid frame doing teal instead of purple. See my tag for reference. Now time to place our tubes in there of course. Using magic wand tool select inside part, invert selections and contract by 1. I do this because when we erase parts of the tube layer, it looks more seamless that way. Paste tube as new layer and arrange to your liking, re-size if necessary. Once happy with placing, grab your eraser tool and erase the bits that hang over on the bottom. Select none, duplicate tube and apply gaussian blur of 5 and change blend mode to soft light. On the bottom tube apply Xero Porcelain with the default settings. Repeat these steps on the other frame.
• Re-size your image to what you want your ending tag to be and add any elements of choice and re-sizing and positioning as you like. If you are using same kit I did there are LOADS of fabulous elements in there. At this point I also applied my drop shadows using Eye Candy 5 Perspective Shadow but if you don't have that filter, the drop shadow feature in PSP works just great as well. On the background layer, add a new layer. In your material palette create a gradient from your 2 main colors of the tag and flood fill on that new blank layer and apply Melissa's mask, merge layer group. I used my deform tool to stretch it just a little.
• Add the artist's copyright and your tagger's watermark to the tag and then of course your text. I used P22 Oh Ley but if you don't have that font, just use your fave scripty font of choice. Hide white background layer and save as a png and voila you're all done! I hope you've enjoyed my tutorial.

This tutorial was written by Tonya on June 13, 2010 and absolutely no part of this tutorial may be taken or used without my express permission. Any similarities to any other tutorial is purely coincidental.
Thursday, June 10, 2010

• Breast Cancer Awareness scrapkit made by the awesome Tracy.F it is available for purchase at her store.
• I used 3 tubes I had purchased at Zindy Zone's. Please do not use this artist's work without a proper license to do so.
• Template I used was by Tracy.F go to blog to get it. Thank you so much Tracy!
• I used a mask 196 from Insatiable Dreams, please check out the masks there, they are awesome!
• Filters I used were Tramages Tow the Line, Filter Factory E Metal Peacocks, Filter Factory G Glass Pyramids, Eye Candy 4000 Gradient Glow, Super Blade Pro, Eye Candy 5 Impact Perspective Shadow, Xero Porcelain, Muras Meister Copies, and Toadies What Are You. Phew! I love filters lol
• Font used was Laine Day which I cannot share, but any font of your choice will work nicely.
Okay ready, let's go, this won't be too hard I promise!
• Open up Tracy's fab template and as her dpi setting doesn't exceed 72 no need to change that if using PTU tubes woohooo! I changed canvas size to 650x650 so we have a lil more room to work. I deleted the credits layer and added a blank layer, flood filled white and sent that layer to the bottom. Let's start out by putting our tubes on the template how we want. You can use my tag as a reference. On Circle 1 layer, select all, float, defloat and paste tube as a new layer. Re-size the tube to your liking so she'll fit in there nice. Invert your selections and press delete this will remove all the excess stuff that hangs over the circle. I have the tube above the circle 1 layer but below the frame. Now as long as you have your selections nice, invert selections again so you have the circle selected and add a new layer above the circle layer (this should be below the tube layer you just added. Paste paper of choice into selection on that new layer, I used paper 20. Select none. I chose to change the blend mode to screen on this layer so that you can see the effects of Circle 1 but the color matches closer to what your tag will be. If Screen doesn't work for ya, choose a different blend mode, it may vary depending on the tones you choose for your tag. Repeat each of these steps for Circle 2 and Circle 3 layers. I used a different Zindy tube on each of them, that's all personal preference though, whatever you like for your tag.
• On the Rectangle layer, select all, float, defloat and add a new blank layer. Have a light pink color and a dark pink color in your background and foreground material palette. I used #eb6d8b as Foreground and #ffe3f5 as my background colors, chose the foreground-background gradient linear style with angle of 45 and repeats of 5. Flood fill in that new blank layer that you should have still selected. Select none and delete the original Rectangle layer. Grab your text tool and choose your fave pixel font, I used Oh La La (be sure that your anti-alias is on OFF for this as it makes the text look much clearer that way, no width, and no bold). Add a new layer above the gradient layer you just created and type text of your choice. I typed mine in font color of black and typed: Faith Love Hope Strength and put somewhere in middle of canvas, select none or promote to raster layer depending on how you do your text. Apply Mura Meisters Copies, I chose the Tiling preset and changed the Tile Gap to 2 and apply. I chose to center the text in my gradient box whatever works for your preferences. On the gradient box layer, select all, float, defloat, invert selections and then on your tiled Muras layer, press delete. That should leave your text all nice on top of that layer. I changed the blend mode of the text to Soft Light. It may vary depending on whatever colors you've chosen to use.
• On Circle Frame 1 layer, select all, float, defloat, add a new blank layer, and paste into selection paper of choice on that new layer. I used paper 1. Select none and delete original Circle Frame 1 layer. On the new pink layer you have, I applied a noise setting (Adjust > Add/Remove Noise > Add Noise). I used Uniform at Noise of 50% and have Monochrome selected. Again this is all just preference, lots of noise filters out there, just use your fave! Do these steps on each of the frame layer (a total of 4 of them currently in the tag).
• On text layer, let's change the black text and make it colorful, I think Pink is a great choice! I used my manual color correction tool for this step. When you've activated that tool, change the source to be the black color by clicking on it. Click in the target box and change it to whatever color you want from your tag. I chose to use #eb6d8b and click OK. I applied a nice inner bevel to mine and then used my Eye Candy Gradient Glow 4 filter to give it a nice stand out effect for such an important message and then of course a nice drop shadow.
• Now lets use that gorgeous mask! On the white background layer, add a new layer, select all and paste a paper of choice (I used paper 3) into selection on that new layer. Select none and apply mask and merge layer group, I then re-sized by 95% and using my deform tool dragged in and out the layer until I got my most preferred result lol.
• Okay! Time to pretty it up with some filters and stuff right? On each of the filled circle layers (the papers I filled in earlier underneath each of the tubes) I applied filters of Metal Peacocks on one, Tow the Line on another and also Glass Pyramids on the last one. You can use all one filter or different, just whatever you like. At this point I also re-sized my tag to my final ending tag size. It just helps so I know how it'll look when I use the tag. After sharpening the tube layers, I applied Xero Porcelain (default settings) and then Eye Candy 5 Perspective Shadow. I also changed each of the tube layers' blend modes to Luminance (Legacy). On one of the tube layers, I did duplicate, apply gaussian blur of 5 to the copy and changed blend mode to Soft Light. What this did was darken it just a smidge. You'll get the idea by playing around with the modes.
• All that's left is do your finishing touches as I call them. First and foremost of course is add your artist's copyright and taggers watermark. I always do this step after re-sizing so it's as clear as possible. I find it sometimes helps to apply a very slight gradient glow to this layer. Helps to dell some of the stuff behind it so the © sticks out more. Then just add your elements of choice and your drop shadows. I used Glitter Swirl 3 underneath all the layers, duplicated and mirrored. Then I duplicated that one and rotated to the right by 45° and placed to my liking so it looked good. I merged the 3 glitter swirls together, and duplicated. On the bottom copy, I applied Toadies What Are You filter with the default settings. Make sure that your background and foreground are on white otherwise you may get some funky shadows.
• Now just do your text, I used Laine Day and also used Super Blade Pro (a pretty pink setting) and gradient glow with a nice drop shadow. Now you should have one very pretty tag with a very important message. I hide the white background layer so it posts nicely and save as a png. Voila you're done! I hope you've enjoyed my tutorial.
This tutorial was written by Tonya on June 10, 2010 and absolutely no part of this tutorial may be taken or used without my express permission. Any similarities to any other tutorial is purely coincidental.
Tuesday, April 20, 2010

This is the tag we'll be making and what you'll need:
• Annegret scrapkit made by the very talented Seven it is available for purchase at her store.
• I used a tube I had purchased of Jamie Kidd's which I purchased at CILM. Please do not use this artist's work without a proper license to do so. CILM is now closed, and you can now purchase her art tubes at CDO here.
• Template I used was by Rose go to blog to get it. The Daydreamer temp is 2nd one down. Thank you so much Rose!
• I used a mask 51 from Magsnificiant Creations blog, please check out the masks there, they are awesome!
• Filters I used were Tramages Cirquelate, Eye Candy 4000 Gradient Glow, Super Blade Pro (coconut ice setting), Eye Candy 5 Impact Perspective Shadow, Xero Porcelain, Filter Factory E Mo' Jellyfish.
• Font used was Adagio Pro which I cannot share, but any font of your choice will work nicely.
Okay ready, let's go, this will be really easy I promise!
• Open up Rose's fab template, and delete Raster 7 as it's not needed. Change Canvas Size to 600 x 600 so we've got lots of space to work around in. You may need to floodfill the bottom (Raster 6 layer) white again. Just gives us plenty of space to see what we are doing. If you are using a PTU tube it is very important you change the overall image to be no more than 72 DPI. This is in accordance with the TOU that each of the PTU agencies impose. To do this, go to re-size, uncheck the "resample using" box mine is in the middle of the page, depends on which version of PSP you are using. Change the resolution to 72 and press OK. Alright now let's start and do what we need to with our layers lol, we'll work from the bottom up.
• On Raster 2 layer, let's colorize that to match whatever your tag colors are going to be, I chose to make that layer a darker purple. It doesn't show much but it depends on how you decorate your template as to what will show. Using the manual color correction tool, I selected a color from the first (current) image as the source and chose a dark purple color as the target. You can see a preview of what it will look like in that window so you can fine tune as need be. When happy click OK.
• On Raster 1 layer, the semi circle, I selected all, float, and defloat, added a new blank layer and paste paper of choice (I used paper 11) into selection in that new layer. Select none and delete the original Raster 1 layer. While on that new layer you just created with that paper, go ahead and apply Tramages Cirquelate to that layer. It's important to have your background color a darker green of that paper, I used code #b0ce94.
• On Raster 5 layer, using your deform tool (or pick whichever you prefer). Move that layer down just a smidge so that it is flush with the edge of the noise layer (you won't see any of that green layer beneath it). Also you will need to stretch the side on each just a few pixels as there might be a space or two of the green showing beneath. I applied Filter Factory E Mo' Jellyfish to this layer just to give it some definition. I changed tile size to about 223 or so, totally style preference though, whatever you like on it.
• On Raster 4 layer, you may need to move this down some so that it is centered on that raster 5 layer. I changed the color of the Daydreamer text from white to a light purple (I used #d9aedf) using the manual color correction tool like before. We will do more with this layer but we need to do other stuff first lol.
• On Raster 3 layer, I changed the color of the butterfly doodle from the purple to a light green using the manual color correction tool. Select the current purple color as the source and a light green as target color. Select all, float, and defloat, apply Super Blade Pro Coconut Ice setting and select none. Now our temp starting to look pretty yes? But let's make the tag look gorgeous.
• I opened up the pretty flower #3 from the kit and paste as a new layer above the green semi-circle that you applied the Cirquelate filter to. I re-sized the flower to about 60% and moved over to the left hand side, right about where the text Daydreamer starts. Duplicate and move up and to the right a little so that the next one is just up a little on that semi-circle. Continue to do this until you have them all the way around. I ended up with a total of 6 of them. I applied a drop shadow using Eye Candy 5 Perspective Shadow to each of the flower layers. Here's a pic of what my settings looked like:

Once happy with all of them, start with the top most flower layer and merge down until all of the flowers are on one layer. Select all, float, defloat, contract selections by 1 and now go back up to the Raster 4 layer and using your eraser tool erase the parts of the Daydreamer text that the flowers hang over on. Do the same on the Raster 5 layer (the purple strip beneath the Daydreamer text). Now back on the Raster 4 layer (Daydreamer text) select all, float, defloat, and apply Super Blade Pro Coconut Ice setting to the Daydreamer text and once that is done select none. Now I applied a slight gradient glow using Eye Candy 4000. Here's what my settings looked like (first panel is settings of 5, 25, 100).

• Back on the flowers layer, add your tube as a new layer. We want this to be above the flowers layer but below the Raster 5 layer. This is a great template for use on those half body images. Re-size and position where need be.
• On the white background layer (beneath the purple glitter layer) and paste the glitter frame 5 as a new layer. Using your deform (or pick) tool, drag it so it fits around the top of the purple glitter layer nicely. Don't worry about how the bottom looks we'll fix that! Using your selection tool (set on rectangle) draw from where your where your purple rectangle and Daydreamer text are all the way across so that you have the bottom half of the glitter frame and once happy press delete. This is what it looks like to give you and idea.

• On white background layer again, select all, add a new blank layer and paste paper of choice in that new layer. I used paper 21. Apply mask 51 as linked above and merge layer group, duplicate and mirror the images, merge down those 2 masked layers together. Do any re-sizing or moving with your deform tool as need be.
• At this point re-size your total tag to what you want your ending tag size to be and sharpen any layers that need it and apply any drop shadows as need be. On the tube layer, I applied Xero Porcelain and then the drop shadow that I used on the flowers which gave her a nice glow. Apply your artist © information and tagger's watermark. I also applied a very light gradient glow to these layers so that they stood out more. I always try to put the © info right on the tag itself to protect the information.
• Add a new layer and do your text. I used the font Adagio Pro in white and applied a pretty lime green super blade pro preset and then a nice gradient glow with drop shadow. Use whatever your preferences are for text, those are just what I used but that is all just personal preference. Once done with text, hide the white background layer and save your tag as a png and voila all done!
This tutorial was written by Tonya on April 21, 2010 and absolutely no part of this tutorial may be taken or used without my express permission. Any similarities to any other tutorial is purely coincidental.
Saturday, April 3, 2010

This is the tag we'll be making so, here's what you'll need:
• Tube I used is by Lorenzo DiMauro which I purchased at his site please do not use this tube if you do not have an appropriate license to do so! This tube is in honor of my good friend Raqual and I wanted to do a tag and tut with it that would help get the important message to GET SMOOSHED!
• Mask I used was from Creative Misfits blog, you can get it here I used KyLie_Mask_mf01.
• I used a template by Punky Butts and you can get it here, I used template 49.
• I love filters lol, so here's what I used: Super Blade Pro (coconut ice setting), Xero Porcelain, DSB Flux Bright Noise, Eye Candy 4000 Gradient Glow, Eye Candy 5 Perspective Shadow, Tramages Tow the Line, Filters Unlimited 2 (used paper texture Wallpaper Fine, but any texture effect of choice will do if you don't have the filter).
• Gradient of choice, I used PinksHaveIt_CC.
• Fonts used were Black Rose and Harmonica, unfortunately Harmonica is pay so I cannot provide that one, but use whatever font you like.
Okay ready, let's go, this will be fun and easy!
• Open up Punky Butts fab template, duplicate the image and close out the original. Delete layers of Credits, Wordart Frame, Wordart, and dots, as pretty as they are, I ended up not using them. Turn visiibility of background layer on and I increased canvas size so it gave me more room to work and I could see what I was doing better. I changed my size to 850 x 650 lol I know that seems huge but we will re-size and crop and all that good stuff later. Okay now let's work from the bottom up on this fab template.
• On Strip layer, change that to a pink color that matches your tube, below is a screen shot of what mine looked like. After changing the color, I applied Filters Unilimted Paper Textures Wallpaper Fine. If you don't have the filter just use a different texture effect of choice (under Effects, Texture Effects, Texture). I then applied a very slight gradient glow using the filter Eye Candy 4000 using black and the pink I'd changed my Strip to. See my tag as an example.

• Hearts2 layer, using manual color correction tool again, I changed the color to the pink color I had changed the strip too, just change the source color from the blue to the pink color the hearts currently are. Once done, select all, float, defloat and apply Super Blade Pro coconut ice setting. If you don't have that filter, you can apply a nice inner bevel instead. After applying the SBP filter, I applied a gradient glow, just a nice subtle one like on the Strip layer. Repeat these same steps with the Hearts 1 layer.
• Heart right layer, select all, float, defloat, add a new layer, I contracted the selection by 2 and flood filled with the gradient I chose to use. Select none and delete original Heart right layer, leave selections active. Let's go and paste the tube as a new layer now as long as we still have our selections. I didn't do any re-sizing on it and once happy with the position of the tube, invert your selections and press delete. I changed the blend mode to Luminance (Legacy). Select none and on the heartframe right layer, I used manual color correction tool to change to a pretty pink color, my target was #d9748d and applied an inner bevel of choice. Repeat these same steps on Heart left layer, I just had a different part of the tube as the focal on this one. See my tag for reference.
• Circle layer, before we do much modification to it lol, lets get our tube in there nicely. select all, float, defloat, invert selection, contract selection by 1. Paste tube as a new layer, re-size if you need to at all and once happy with placement, grab eraser tool and erase and part that hang over the circle on the bottom. Select none. Now click on the blue in that layer and I used manual color correct to change the color to one that matches the tag. Leaving selection active, I applied Filters Unlimited Paper Texture Canvas Fine. If you do not have that filter, you should be able to achieve similar pretty effect using the texture effects within psp. Select none. Now select the black area of the circle using your magic wand tool and apply Tramages To the Line, I just used the default settings. However I wanted to make them lines pink lol! So leaving selections as is, I zoomed in a bit and applied manual color correction. Reason for zooming in a bit is to easier select the color of those gray lines as the source, and the target be a pink color from my tag. See screen shot below for example. Select none when done with that and then I applied a gradient glow around the whole layer using the pink and black.

• Lil hearts top layer, using the manual color correction tool, I changed them to match the dominant mauve color I've been using in the tag. Once done to your liking, select all, float, defloat, and I applied Super Blade Pro coconut ice and then apply gradient glow as used before. Now we've got our template basically done, let's pretty it up with some minor effects, we're almost done woohoo!
• On the background layer, add a new layer, and flood fill with the gradient of choice you are using for this tag. Apply KyLie's gorgeous mask and once happy merge layer group. Do any re-sizing if need be of the mask layer. At this point I also cropped any of the excess and also re-size your tag to what you want your ending size to be. Sharpen any layers that need it. I applied Xero Porcelain to the main tube layer, using the default settings. Apply drop shadows to your layers at this point, I like to drop shadow pretty much every layer lol. I used Eye Candy 5 Perspective Shadow but if you don't have that filter the drop shadow in psp will work beautifully as well.
• Back up to the top of the layers, I added a new layer and typed the text "Get Smooshed" in place of the original wordart that came with the template. In light of the pink ribbon on the tube, I wanted to add an important message for this tag. I used the font Black Rose and once happy with placement, I applied DSB Flux Bright Noise, intensity set at 39, and Mix selected as well I applied a nice subtle gradient glow to the words to make them pop out a bit and a blurry drop shadow.
• Add the artist's copyright information and your tagger's watermark to the tag. All that is left is to do your text. I used Harmonica font using the gradient I had used in the tag previously and applied Super Blade Pro coconut ice and gradient glow and of course a nice blurry drop shadow. Close off the white background layer if you prefer transparent backgrounds and save as a png and voila all done, I hope you've enjoyed this tutorial.
This tutorial was written by Tonya on April 3, 2010, absolutely no part of this tutorial may be taken or used without my express permission. Any part that may be similar to any tutorial is purely coincidental and unintended.
Subscribe to:
Posts
(Atom)
Grab My Blinkie
