Note, this tutorial I wrote about a year ago but never posted it to my blog. Bad Tonya!!! So I'm doing it now, hope you can get some good use out of effects that I did on this.

This tutorial was written by Tonya of Tonya's Temptations on 8/7/18 in PSP X5, however any version should work fine. Any resemblance to any other creation out there is purely coincidental and unintended. Please do not copy my tutorial either in full, or in part, or claim as your own. Please do not re-distribute my tutorial. There is no scrapkits harmed in the creation of this.
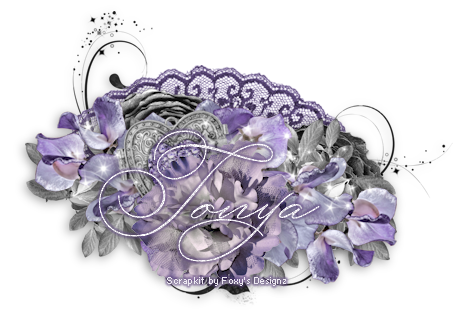
I used the amazing artwork of Alena Lazareva - this tube was a bonus tube in August 2018 at CDO, so unfortunately this tube is not available any longer but any pretty tube should suffice.
Okay let's see to do this you will need
• a tube of choice
• Filters of choice - I have used DSB Flux - Bright Noise, Mura Meisters Copies, Tramages, Cirquelate, Two Moon Wish It Would Rain, Two Moon Endangered Species, Eye Candy 5 Impact (Glass), and any effects you like to do with your text
• Fonts of choice, I used Impact for the word in the background and just a scripty font to your liking for your name
• Brushes of choice, although this is not required, just an extra thing
......................................... Tagging shall commence here:
> Open a new canvas whatever size you like, I did mine at 675x275 cuz I like odd sizes!
> Paste your tube on your canvas to whatever size you like, on the tube I used, I did re-size down 70%, center how you like it to be placed.
> Duplicate the tube, on the bottom copy apply Mura Meisters Copies choosing the setting of Wallpaper (rotate) with default settings
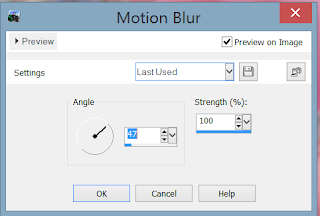
> Apply Motion Blur (in X5 it is Adjust > Blur > Motion Blur) angle of 47 and strength of 100. Duplicate this layer and mirror it. On the top copy apply the blend mode of Screen, merge down so its one pretty pink layer. Duplicate this layer and apply Tramages Cirquelate and at setting of 48. Change the blend mode to Screen and lower opacity to your liking, mine was at 83.
> Paste your tube again a few times behind the main tube but above the layers we just did. I put them at differing places to add a lil depth into the finished result. Once you are happy with placement, merge those layers down so the copies of tubes all one layer, but do not merge to the layers below. Keep everything separate in case you want to change things around later.
> Duplicate the above tube layer, on the bottom copy change the blend mode to Soft Lift, and on the copy (above layer) change the blend mode to Screen and I put mine at opacity of about 26. On the bottom layer the Soft Light one apply the filter Two Moon - Wish it Would Rain with the default settings.

> On the very bottom layer, the original blur layer view that layer, and copy merged (Edit > Copy Special > Copy Merged), then go back to viewing all of the layers again, and paste the layer on top of all the others. We are going to do a bit of a frame on this. After pasting, select all, contract by 4 and delete. Apply DSB Flux, Bright Noise with the Mix setting selected, and an intensity of 45. Add another layer, I chose to use a gradient of mine here to add extra colors into the border, flood fill with the gradient, Select All and contract by 3, press delete. Select None, Select All, Contract by 1, invert selections and press delete. You should now see your glitter border on both sides of it. Duplicate this gradient layer, select all, float, defloat and apply Two Moon Endangered Species with the default settings. Change blend mode to Screen on this one. Put a drop shadow on the glitter frame to your liking.
> Apply a drop shadow to your main tube layer.
> Under your tube layer, choose a word that you want to put with it, I chose the word PRETTY in the Impact font, I think I used size 100. I did use a lighter color for the font on this one, however that is all personal preference. I moved it over to the left, duplicated, and moved the copy to the right. Try to make sure you have them even so they look like they are in a line. Merge down so you just have the one layer. I put the blend mode to Burn on this one.
> Duplicate the font layer, changing blend mode for now to Normal. Made this a darker color by using the Manual Color Correct tool. Select all, Float, Defloat, Contract selections by 1, press delete. I applied the DSB Flux Bright Noise to this layer, but I changed the intensity to 27. I put the blend mode to Dodge on this one.
> On the original font layer, select all, float, defloat, add a layer above the outline and I applied the Eye Candy Impact 5 Glass setting of Clear, with no drop shadow. Default settings. Select none, and if necessary adjust the color to match your tag some with Manual Color Correction tool.
> I applied a drop shadow on the layer with the border of the letters.
> At this point I applied a few brushes, one with a sparkle brush, color of dark pink but I put the blend mode to screen to add some sparkle in to the tag for the background, and another heart doodle brush I happen to have, did the same thing with that one.
> Now at this point, important, I added the credits for the art tube, I always do that at the end in case I have to re-size my tag at all so the credits do not get blurry. My credits are all brushes but you just do those however you normally do.
> Next put a name on this beauty - if you need a name Tonya looks good :) Or whatever you think works best.


0 comments:
Post a Comment