About Me
- Tonya
- Hiya I'm Tonya! I'm an avid psper, have been for a few years and finally have me a blog that I've been working on slowly getting stuff added to. I started writing tuts and recently started making masks and templates. I LOVE to see creations you've made with my things, if you'd like to email me please do so at aquaspinner@gmail.com ................................................. My TOU are as follows: All of my items are personal use only NO Commercial Use, please do not share (distribute) my stuff in groups, just send people here to grab please. ♥ Tutorial writers, if you wish to use my stuff in your tutorials, of course I am honored! You're more than welcome to use my stuff in them, I only require that you link to me and send people here to grab the goodies that you are using in the tut. ................................................. Hope you'll enjoy what I have for ya and thanks for stopping by. ♥
My Artist CTs ♥

My CTs ♥



My Guest CTs ♥
Sunday, January 17, 2010

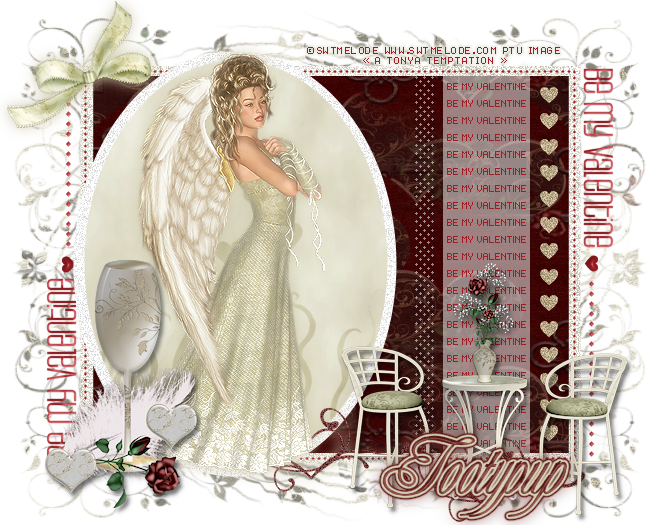
This is the tag we'll be making, another nice easy scrappy tag. So, here's what you'll need:
• I used the scrapkit Je t'aime mon amour by the very talented Tootypup please go to her blog to check out her stores. Click here to go to Tootypup's Blog.
• Tube I used were by SwtMeloDe and can only be used with purchase at SwtMeloDe however any tubes you want to use will do.
• Mask I used was by Babe, you can get it here I used mask 13, all her masks there are fab!
• Template I used was a collab template by Rose and Kristin and can be obtained here.
• The filters I used were DSB Flux Bright Noise, Xero Mistifier, Eye Candy 5 Perspective Shadow, and Eye Candy 4 Gradient Glow.
• Font used was Van Rose, but use whatever font you wish.
Okay ready, let's go!
• Open up Kristin and Rose's template, duplicate and then close out original. Change canvas size to 700 x 600. Delete the credits layer and on the white background layer, flood fill with white if needed. Very important here, change the DPI of the image to 72.00 DPI. If you don't know how to do this, go to re-size, uncheck "resample using" and change the resolution to 72.00, click OK. This is important if you are using PTU images as the template image DPI was set at 200 and most agencies require no more than 72.00.
• On glittered rectangle layer, select all, float, defloat, add a new layer, and paste a paper of choice into new layer (I used paper 1). Select none and delete glittered rectangle layer. Apply DSB Bright Noise to the new layer you created, I used a setting of 41 and in Mix.
• On Rectangle layer select all, float, defloat, add a new layer, and paste paper of choice into selection on new layer (I used paper 14). Select none and delete original rectangle layer. In your material palette, set your background color to a red color of your choice (I used one from the red paper I just used). On layer above dotted rectangle, add a new layer and flood fill the whole layer with that red in your background palette. On dotted rectangle layer, select all, float, defloat, invert selections and then on the red layer you just flood filled, press delete. Select none and delete original dotted rectangle layer. Do the same with the wordart, dotted lines, and pixel word layers. I added a nice inner bevel to the new dotted lines and wordart layers.
• Paste tube on image, I had mine so she took up most of the oval. On the oval layer, select all, float and defloat, add a new layer and paste paper of choice into selection on new layer. Using the manual color correction tool, I changed to match a light beige from the tube. On the Hearts layer, add a new layer and flood fill with a color of choice. On the original hearts layer select all, float, and defloat, press delete on flood filled layer, select none and delete original hearts layer. Apply DSB Bright Noise to the new hearts layer.
• On white background layer, paste paper of choice (I used paper 11a), re-size to your liking and apply Babe's mask. Once happy with it merge layer group. Add other elements you wish to use, there were so many fab elements in Tootypup's kit I had a hard time choosing! At this point re-size your tag to your final ending size and add any drop shadows needed, I used Perspective Shadow. I also applied Xero Mistifier to my tube to give her a muted glow.
• Add the artists copyright information and your taggers watermark and then just your text and that's it! I hope you've enjoyed this tutorial.
This tutorial was written by Tonya on January 17, 2010, absolutely no part of this tutorial may be taken or used without my express permission. Any part that may be similar to any tutorial is purely coincidental and unintended.
Saturday, January 16, 2010

This is the tag we'll be making and what you'll need:
• Pink Chocolate scrapkit by Fantasy Moments, please leave some love if you download!
• I used a tube of Ismael Rac's which is available for purchase at AMI. Please do not use this tube if you do not have appropriate license to do so.
• Mask I used was by Weescotslas, you can get it here it's Mask 120.
• I used was valentine template 13 by the fabulous Stef of Freebie Friends, please leave some love if you download.
• I used Filter Factory E Metal Peacocks, Eye Candy 5 Perspective Shadow, Eye Candy 4 Glass, Eye Candy 4 Gradient Glow, and Xero Porcelain in this tag. Whew! I love my filters lol.
• Font used was Valentina JF which unfortunately I cannot supply but use whatever font you like!
Okay ready, let's go make a really easy temp tag!
• Open up Stef's beautiful template, duplicate the image and close out the original. Delete the credit layer and change the canvas size to 700x700. I added a layer, flood filled white and sent to bottom so I was able to see what all I was doing. On Rectangle 1 layer, select all, float, defloat, invert selections, paste a paper of choice as a new layer. I chose to also re-size by about 80% (I used paper 1). Press delete to remove excess, select none, and delete original Rectangle 1 layer. Repeat these steps for Rectangle 3 layer. Repeat these steps for Rectangle 2 and 4, this time I used paper 5.
• On Heart layer, select all, float, defloat, invert selections, paste a paper of choice as a new layer (I used paper 3), resize a little if you like, press delete and select none. Delete the original Heart layer. I deleted the Raster 2 layer (the Be Mine words). On Raster 3 use your manual color correction tool to change the color to color that matches your background, I chose to use a pink from the paper I used for the heart. Do the same for the Raster 4 layer. I applied a Perspective Shadow setting to each of the words, made them pop out a little more. If you don't have that filter you can achieve similar effects with drop shadow from within psp.
• Change your background color to a color of choice, again I used a pink color from the paper in the heart layer I just pasted in. On each of the black frame layers (Raster 1, Rectangle Frame 2, etc) and clicking on the black part flood fill with that color. I applied an inner bevel setting, use whatever one you think fits well. Do this on each of the black rectangle frame layers. On the black heart frame layer, I just used a turquoise color from the paper I used in 2 of the rectangles. Also apply that inner bevel setting here.
• Okay let's put our tube in there. Paste tube on top of the pink heart layer you just created in above steps. Select all, float, defloat, expand by 1 pixel, invert selections, and on the tube layer grab eraser tool and erase any bits of the tube hanging over you don't want showing. Kind of have her peeking out of the heart so to speak.
• On each of the paper layers (the heart and the 4 rectangles) apply Filter Factory E Metal Peacocks filter. I just used the default settings but play around with whatever you like. Add any elements you want at this time, I just added a bow at the bottom, I know not a lot of elements in this tag but sometimes that works lol!
• On white background layer, select all add 2 new layers. On one of them paste a paper of choice into selection, I used paper 21 and do the same thing for the 2nd blank layer you just added, this time I used paper 22. Apply WSL mask 120 to both of the layers, merge layer group on each of them. I flipped and mirrored one of them, using move tool to arrange how you like.
• Okay re-size your tag at this point to how you want ending size to be. Add artist's copyright and your tagger's watermark if you use one. Sharpen any layers that need it (especially the tube!) and on mine I applied Xero Porcelain to the tube, duplicated the tube, applied a gaussain blur of 1 to the tube copy, moving it below the original tube. On the original tube layer, I changed the blend mode to lighten. This is all just a preference and it may differ depending on what tube you used.
• Okay! Just add your text however you like. I chose to do mine in a turquoise color from one of the papers, added an inner bevel, gave an Eye Candy 4 Glass setting and created an Eye Candy 4 Gradient Glow using 3 colors from my tag with a drop shadow. Voila! That's it and I hope you've enjoyed this very easy tutorial♥
This tutorial was written by Tonya on January 15, 2010 and absolutely no part of this tutorial may be taken or used without my express permission. Any similarities to any other tutorial is purely coincidental.
Thursday, January 14, 2010

This is the tag we'll be making and what you'll need:
• S.W.A.K. scrapkit made by the awesome QueenBrat it is available for purchase at her store. This kit is chock full of awesome goodies!
• I used a tube of Jamie Kidd's which can be purchased at CILM. Please do not use this tube if you do not have appropriate license to do so. CILM is now closed, however you can now purchase Jamie's tubes at CDO here.
• I used mask 320 from Vix, she has so many great ones! Go here to get them and please read and follow her TOU.
• Template I used was template 317 by the talented Missy of Divine Intentionz, please leave some love if you download.
• I used a few filters in this one lol, they were: Tramages Tow the Line, Eye Candy Gradient Glow, Xero Porcelain, and Eye Candy 5 Perspective Shadow
• Font used was Heartland Regular which can be found at daFont or you can use font of your preference.
Okay ready, let's go make a purdy taggy!
• Open up Missy's template, I re-sized the canvas 700 x 700 so we had lots of nice space to work with. I also unhid the bottom layer and flood filled white so it made it easier for me to see what I was doing. Delete the credits layer. On top of background layer, select all, float, defloat, add a new layer and paste paper of choice into new layer, I used paper 12. Apply Vix' beautiful mask and merge layer group. I deleted thin rectangle layer as I chose not to use it.
• On Circle1 layer, select all, float, defloat, add new layer, and flood fill with a color from your tube (I used a nice red from her dress). Apply Tramages Tow the Line filter with default settings to the red circle. Select none and delete original Circle1 layer. On Oval layer, select all, float, defloat, invert selection, paste paper of choice (I used paper 1) re-size a little if you wish and then press delete. Select none and delete original Oval layer.
• On Circle2 layer, select all, float, defloat, expand by 1, flood fill with color of choice (I just used black) and select none. Do same with Circle 3 layer and I just used the red color from before again. I left Raster 2 as it was. On small circle layer, select all, float, defloat and paste paper of choice (I used paper 6) as a new layer, re-size a little if you like. Invert your selection and press delete. Select none and delete original small circle layer. I left small circle 2 layer as is. On the brush layer, I used my manual color correction tool to change the pink to a pretty red that matched the dress again.
• On wordart by Missy layer, I chose every other letter, expanded by 1, added new layer and flood filled black. I applied a nice inner bevel. Did that again for the other letters words. See my tag for reference. Once you are happy with the looks of it, merge down so it's all one layer again.
• Add the tube above the white paper layer but below the wordart. After re-sizing if you wish, on the white paper layer, I selected all, float, defloat, expand selection by 1, invert, and on the tube layer, grabbed my eraser tool and erased the bottom part that was hanging over the circle. This makes her look nice and blended into the tag, no rough edges.
• Add elements of choice to your tag. I added one of the balloons, re-sizing and rotated having it appear behind the one circle a bit so it looks like it's coming out from behind. Added some bows and ribbons to pretty it up so it looks like the tube is all wrapped up. Once I had the ribbon 2 re-sized and situated, on the bigger black circle, I selected all, float, defloat, expand by 1, invert selection and on the ribbon wrap layer press delete. This makes it look like the ribbon is wrapping around the circle. I also took the Lips1 element, and used my manual color correction tool to match the lips to the deep red again (what can I say I love red!) and rotated and re-sized so I could place inside heart.
• At this point I re-sized my tag to what the ending size was going to be, sharpening any layers that need it and applying drop shadows. I used Eye Candy 5 Perspective Shadow on a few of these layers, but if you don't have the filter you can get similar effects with the drop shadow function in PSP. I applied a very subtle Eye Candy Gradient Glow around the tramages circle layer and the oval circle layer. Add the artist's copyright to the tag and also your tagger's watermark if you use one.
• On the tube layer, I applied Xero Porcelain (default settings), duplicated, moved that copy below original tube applying a gaussian blur of 1 to that layer. On the original tube layer, I changed the blend mode to Soft Light.
• All that's left is to add your text, I used Heartland Regular with a nice inner bevel setting and then Eye Candy Gradient Glow with an Eye Candy Perspective Shadow. These are all just preference so however you like to do your text.
• That's it! I hope you've enjoyed this tutorial and you found it easy to do.
This tutorial was written by Tonya on January 14, 2010 and absolutely no part of this tutorial may be taken or used without my express permission. Any similarities to any other tutorial is purely coincidental.
Monday, January 11, 2010

This is the tag we'll be making and what you'll need:
• A Funky Kind of Love scrapkit made by the very talented QueenBrat it is available for purchase at her store.
• The tube I used is by Caron Vinson which is available for purchase at CILM, please do not use this tube if you do not have an appropriate license to do so. CILM is now closed, but her tubes can now be purchased at CDO here.
• I used a mask available on the Creative Misfits blog, there are lots of great ones there! Please leave some love if you download.
• Template I used was by Stef at Freebie Friends blog, please leave some love if you download.
• Filters I used were Xero Porcelain and DSB Flux Bright Noise.
• Font used was Quick Handle which I cannot share, but any font of choice will work nicely.
Okay ready, let's go, this will be nice and easy I promise!
• Open up Stef's fab valentine template number 8, duplicate the image and close out the original, deleting the credit layer. I added a white background layer just cuz I find it easier to work on the tag then you can close this out later if you prefer transparent. Add a new layer, select all, and paste a paper of choice into selection, I used paper 8. Select none and apply mask of choice. You may want to use your deform tool if any adjustments to make the mask show through are needed. Merge layer group.
• On Raster 4 layer, select all, float defloat, add a new layer and paste paper of choice into selection, I used paper 1 on this one. Select none and change the blend mode to one of your choosing, I used dissolve.
• On Raster 2, select all, float, defloat, expand selection by 1, add a new layer, flood fill with color of choice. I chose a pink color from paper 1. Add an inner bevel setting of your choice on that new layer. Select none and delete the Raster 2 layer. Repeat these steps with colors of your choice on Raster 1 and Raster 7 layers as well.
• On Raster 5 layer, select all, float and defloat, add a new layer and flood fill with a color of choice, I used a very light green and I changed blend mode to overlay. On Raster 3 layer, select all, float, and defloat, add a new layer and paste paper of choice into selection. I used paper 6. Select none and delete Raster 3 layer.
• On Raster 6 layer, select all, float, defloat and add a new layer, flood filling with a color of choice, I used a very light purple color and again changed the blend mode to overlay.
• At this point lets add our tube we are going to use. I pasted above the heart frame layer, re-size as needed, once you have positioned as you like, on the heart layer you just floodfilled in previous step, select all, float, defloat, expand by 1, invert selection, and grab eraser tool. On the tube layer erase any parts that you don't want showing. I had it so she is just kind of peaking out from the heart. Since we have the heart selected, on that purple heart layer you had flood filled, add a new blank layer and using your brush tool, put a brush of choice in there, because of your selection it will only fill that brush on the heart layer, nothing more. It's just something to add a little swirliness lol. Select none when happy with it.
• Add elements of choice. I used the LOVE wordart piece along with I made a little cluster using some of the great elements of this kit. Add any elements to make the tag unique to you. At this point I re-sized the tag to my final tag size, and sharpened any layers as appropriate. I also applied Xero Porcelain to the tube layer. Add the artist's copyright and your tagger's watermark at this point.
• Now for the text! Type your text, select none, and duplicate 2 times if you wish to animate. On the first layer of text, apply DSB Bright Noise, I used a setting of 40 and clicked on Mix. Apply a drop shadow of choice (I used settings of 2/2/75/5 and color of #83235b). Hide that layer, unhide layer 2 of text and apply filter again, clicking the mix button twice and applying drop shadow again. Repeat these steps for the third text layer.
• Open Animation Shop, with 2 of the text layers hidden, do Edit > Copy Merged and paste as a new animation. Back in PSP, hide the visible text layer and unhide the 2nd layer and again Copy Merged, paste in Animation Shop after current layer. Repeat for the 3rd layer of text. Once happy optimize your animation. View and save your animation and that's it your done! I hope you've enjoyed this nice and easy tutorial.
This tutorial was written by Tonya on January 10, 2010 and absolutely no part of this tutorial may be taken or used without my express permission. Any similarities to any other tutorial is purely coincidental and unintended.
Saturday, January 2, 2010
Received a new Award from my pal Reina of LadyQueen's PSP Creations, thankyou so much! ♥

Alright so the rules are to pass this to 5 more blog that I think are awesome
here goes in no particular order
• Kathy at Kathy's Place for having so many fabulous tutorials and beautiful blog layout!
• Tracy and Stef at Freebie Friends Scraps and More for offering so many fantastic freebies and having such an easy to navigate blog, it rocks!
• Vaybs of Designs by Vaybs for having so many great goodies on your blog, love the options below each item too!
• Bev of HorsePlay Pasture so many wonderful and easy to do tutorials there!
• Mary of Country Bug, such a cute blog with great tutorials!

Alright so the rules are to pass this to 5 more blog that I think are awesome
here goes in no particular order
• Kathy at Kathy's Place for having so many fabulous tutorials and beautiful blog layout!
• Tracy and Stef at Freebie Friends Scraps and More for offering so many fantastic freebies and having such an easy to navigate blog, it rocks!
• Vaybs of Designs by Vaybs for having so many great goodies on your blog, love the options below each item too!
• Bev of HorsePlay Pasture so many wonderful and easy to do tutorials there!
• Mary of Country Bug, such a cute blog with great tutorials!

This is the tag we'll be making and what you'll need:
• Cute and Girly scrapkit made by the fabulous Yvette available for download. If you choose to download this kit, please 'leave some love' on her 4shared in appreciation, it's what helps keep these freebies free lol.
• I used Mask 17 from Babe's blog, please leave some love if you download.
• Tube I used was by Keith Garvey which is available for purchase through My PSP Tubes, any tube that you wish to use will do though. Please do not use the tube I used without a proper license to do so.
• Wordart piece I used was by Bwitchen and you can get it here.
• Filters I used were Mura Meisters Copies, Eye Candy 4000 Glass, and Eye Candy 4000 Gradient Glow.
• Font used was 1 Archer DNA, which unfortunately I cannot supply, but any font will do.
Okay ready, let's go make a pretty tag!
• Open up a new canvas 700x700 with a white background, it makes it easier for us to see what we are doing. We are going to make the frame from an element woohoo! I opened up Flower branch 3, re-sized it by 45% and rotated 90° to the right. Now grab your freehand selection tool and draw around the stem. Basically we are going to remove the part from the last blue flower on down. Once you've selected all hit delete and select none. You may need to remove a few pixels if anything is left that you don't want in there. Once happy, go and apply Mura Meister's Copies filter using the Encircle setting. I just used the default settings on that Encircle setting. Voila looks pretty don't it? Center in your tag. At this point I re-sized my canvas down to 600 x 600.
• Using your magic wand tool and a tolerance of 0, click inside your frame. Expand your selections by 25. Yeah I know that's a lot but that's to get all those tiny spaces within the flowers. Add a new layer on top of the white background layer and paste a paper of choice in the selection on that new layer. I used paper 11. Now leaving your selection as is, add another new layer on top of that paper layer. I used a texture brush to add some color to that paper (using a blue from the flowers). Once you're happy, select none.
• Time to add our tube on there! I put the tube above the paper and texture but below the frame, and re-sized as appropriate. Once happy with the position, we are going to have her peaking out of the frame a bit. On the tube layer, select all, float, and defloat, contract the selection by 1 pixel. This will avoid those sometimes harsh lines, make it look more natural. Now on your frame layer, grab your eraser tool and erase the parts of the frame to make the tube show. Because we have the tube selected, only the parts of the frame in that selection will be erased. Once happy select none.
• Lets add some wordart! Using the piece from Bwitchen, what I did is using my freehand selection tool, selected around the gray/black one and once I had it all selected, copied, and pasted as a new image. This puts it all by itself and then I made a brush tip (File, Export, Custom Brush). Name it something you will remember. Using a blue color from the flowers and adding a new layer to the tag we're making, grab your brush tool, find your new brush you just exported and click a couple of times on your tag. I clicked a couple of times to make it just a little darker and thicker. Select all, float, defloat and apply an inner bevel setting of choice. Select none and apply a gradient glow of choice. I used the color white and a width of about 5. Just a nice subtle glow to make it stick out more and then a nice drop shadow.
• On your white background layer, select all, add a new layer and paste paper of choice into selection, I used paper 3. Select none and apply Babe's mask, merge layer group. I chose to also apply some bling bling above mask layer. Using glitterspill2 element, I used manual color correction to match up to the blue tones in the tag and pasted the element onto tag as a new layer (above mask layer) and re-sized as appropriate, (I used 75%). Duplicate and mirror, merge down. Duplicate again and flip and merge down again. Duplicate one more time lol and rotate 90° and merge down. Voila we're done with that and got a nice bling effect.
• At this point I re-sized my tag to its ending size and then did my © brush for the artist information and also put my taggers mark on. I always do this after re-sizing so it doesn't get all blurred. At this point also do any sharpening on the images that needs to be done. I also duplicated tube layer, moved duplicate below original tube, applied a gaussian blur of 1 and on the original tube changed the blend mode to Soft Light.
• Now just add your text. I chose to use my preset shape ellipse and drew a circle around the frame and added my text on a curve. That's all just preference though, whatever you like to have on yours. For effects, I used a nice inner bevel again, applied Eye Candy Glass, and Eye Candy Gradient Glow with a nice drop shadow. Hide the preset shape layer if you used that and save as png or jpeg.
Okay that's it! Pretty but effective technique and I hope you've enjoyed this tutorial.
This tutorial was written by Tonya on January 2, 2010 and absolutely no part of this tutorial may be taken or used without my expression permission.
Friday, January 1, 2010

This is the tag we'll be making and what you'll need:
• Shabby Love scrapkit made by the very talented Vaybs available for download. If you choose to download this kit, please 'leave some love' on her 4shared in appreciation, it's what helps keep these freebies free lol.
• I used a mask from Creative Misfits blog, please leave some love if you download.
• Tube I used was by Barb Jensen which is available for purchase through her site, any tube that you wish to use will do though. Please do not use the tube I used without a proper license to do so.
• Filters I used were Tramages Tow the Line, Xero Porcelain, Super Blade Pro, and Eye Candy 4000 Gradient Glow.
• Font used was MTF Under Your Skin, which is available for free at daFont but any font will do.
Okay ready, let's go, this is pretty easy!
• Open up a new canvas 700x700 with a white background, it makes it easier for us to see what we are doing. Paste frame of choice as a new layer (I used love frame 7). Do any re-sizing or coloring you may need to do. I did use manual color correction tool to match the frame up to my tube just a teeny bit, that's all preference though and depending on what tube you used.
• Click inside the frame with your magic wand tool and expand selections by 5. On your white background layer, add a new layer and paste paper of choice into that new blank layer. I used paper 12. Select none.
• On the white background layer again, add another blank layer and select all, paste a paper of choice into selection. I again used paper 12 and then apply the mask of choice. I used mask d1529floral1. After applying the mask, merge layer group, re-size by 90% and use deform tool to make it look how you want behind the frame. In some areas you may need to use your smudge tool to blend the mask a little bit, it's all what you like though.
• Underneath the frame, but above the paper inside the mask, add your tube and arrange how you like. Next on the paper layer, duplicate that layer and apply the filter Tramages Tow the Line and reduce opacity to about 61. On the tube layer duplicate that layer and bring that duplicated tube above the orignial paper layer in mask but below the tramages layer. Reduce the opacity to around 79 of the tube and have her positioned however looks good. I chose to move up and to the left a little and then I mirrored the tube. Select inside the frame, expand by 5, invert selections, and hit delete on the duplicated tube layer. See my example.
• At this point I re-sized my tag to what I wanted ending tag size to be and sharpening layers as need be, adding any drop shadows needed at this point. On the main tube layer, duplicated, and moved duplicate below original tube layer, giving a gaussian blur of 1 to the copy. On the original tube layer, apply Xero Porcelain and change blend mode if you like. I used Luminance (L) on mine.
• Add the artists copyright so that it is clear and legible at first glance and also your taggers watermark if you use one. Now all that is left is to do your text of choice and add any elements or wordart if you like. On my text I just used coconut ice Super Blade Pro setting and a nice subtle gradient glow.
That's it! I hope you've enjoyed this very easy tutorial.
This tutorial was written by Tonya on January 1, 2010 and absolutely no part of this tutorial may be taken or used without my expression permission.
Subscribe to:
Posts
(Atom)
Grab My Blinkie
