About Me

- Tonya
- Hiya I'm Tonya! I'm an avid psper, have been for a few years and finally have me a blog that I've been working on slowly getting stuff added to. I started writing tuts and recently started making masks and templates. I LOVE to see creations you've made with my things, if you'd like to email me please do so at aquaspinner@gmail.com ................................................. My TOU are as follows: All of my items are personal use only NO Commercial Use, please do not share (distribute) my stuff in groups, just send people here to grab please. ♥ Tutorial writers, if you wish to use my stuff in your tutorials, of course I am honored! You're more than welcome to use my stuff in them, I only require that you link to me and send people here to grab the goodies that you are using in the tut. ................................................. Hope you'll enjoy what I have for ya and thanks for stopping by. ♥
My Artist CTs ♥

My CTs ♥


My Guest CTs ♥


Sunday, January 17, 2010

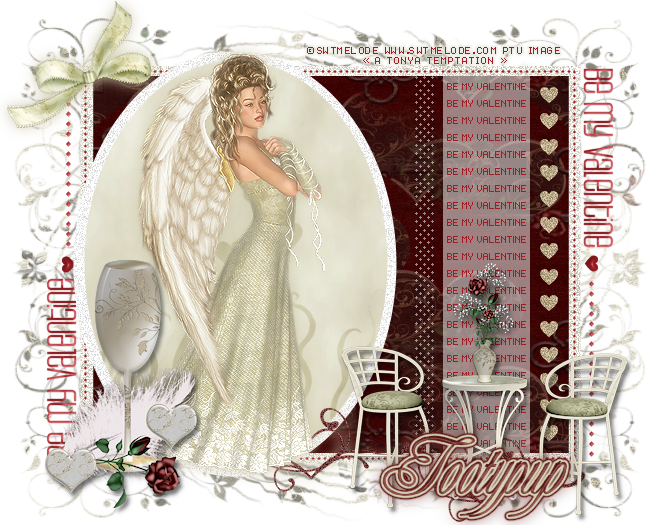
This is the tag we'll be making, another nice easy scrappy tag. So, here's what you'll need:
• I used the scrapkit Je t'aime mon amour by the very talented Tootypup please go to her blog to check out her stores. Click here to go to Tootypup's Blog.
• Tube I used were by SwtMeloDe and can only be used with purchase at SwtMeloDe however any tubes you want to use will do.
• Mask I used was by Babe, you can get it here I used mask 13, all her masks there are fab!
• Template I used was a collab template by Rose and Kristin and can be obtained here.
• The filters I used were DSB Flux Bright Noise, Xero Mistifier, Eye Candy 5 Perspective Shadow, and Eye Candy 4 Gradient Glow.
• Font used was Van Rose, but use whatever font you wish.
Okay ready, let's go!
• Open up Kristin and Rose's template, duplicate and then close out original. Change canvas size to 700 x 600. Delete the credits layer and on the white background layer, flood fill with white if needed. Very important here, change the DPI of the image to 72.00 DPI. If you don't know how to do this, go to re-size, uncheck "resample using" and change the resolution to 72.00, click OK. This is important if you are using PTU images as the template image DPI was set at 200 and most agencies require no more than 72.00.
• On glittered rectangle layer, select all, float, defloat, add a new layer, and paste a paper of choice into new layer (I used paper 1). Select none and delete glittered rectangle layer. Apply DSB Bright Noise to the new layer you created, I used a setting of 41 and in Mix.
• On Rectangle layer select all, float, defloat, add a new layer, and paste paper of choice into selection on new layer (I used paper 14). Select none and delete original rectangle layer. In your material palette, set your background color to a red color of your choice (I used one from the red paper I just used). On layer above dotted rectangle, add a new layer and flood fill the whole layer with that red in your background palette. On dotted rectangle layer, select all, float, defloat, invert selections and then on the red layer you just flood filled, press delete. Select none and delete original dotted rectangle layer. Do the same with the wordart, dotted lines, and pixel word layers. I added a nice inner bevel to the new dotted lines and wordart layers.
• Paste tube on image, I had mine so she took up most of the oval. On the oval layer, select all, float and defloat, add a new layer and paste paper of choice into selection on new layer. Using the manual color correction tool, I changed to match a light beige from the tube. On the Hearts layer, add a new layer and flood fill with a color of choice. On the original hearts layer select all, float, and defloat, press delete on flood filled layer, select none and delete original hearts layer. Apply DSB Bright Noise to the new hearts layer.
• On white background layer, paste paper of choice (I used paper 11a), re-size to your liking and apply Babe's mask. Once happy with it merge layer group. Add other elements you wish to use, there were so many fab elements in Tootypup's kit I had a hard time choosing! At this point re-size your tag to your final ending size and add any drop shadows needed, I used Perspective Shadow. I also applied Xero Mistifier to my tube to give her a muted glow.
• Add the artists copyright information and your taggers watermark and then just your text and that's it! I hope you've enjoyed this tutorial.
This tutorial was written by Tonya on January 17, 2010, absolutely no part of this tutorial may be taken or used without my express permission. Any part that may be similar to any tutorial is purely coincidental and unintended.
Subscribe to:
Post Comments
(Atom)
Grab My Blinkie

0 comments:
Post a Comment