About Me

- Tonya
- Hiya I'm Tonya! I'm an avid psper, have been for a few years and finally have me a blog that I've been working on slowly getting stuff added to. I started writing tuts and recently started making masks and templates. I LOVE to see creations you've made with my things, if you'd like to email me please do so at aquaspinner@gmail.com ................................................. My TOU are as follows: All of my items are personal use only NO Commercial Use, please do not share (distribute) my stuff in groups, just send people here to grab please. ♥ Tutorial writers, if you wish to use my stuff in your tutorials, of course I am honored! You're more than welcome to use my stuff in them, I only require that you link to me and send people here to grab the goodies that you are using in the tut. ................................................. Hope you'll enjoy what I have for ya and thanks for stopping by. ♥
Cluster Frame TOU
Thank you SO much for being so interested in my cluster frames. I love that you enjoy using them.
However I do have a request, please do NOT credit me as the cluster frame on your tags. Although I assembled it, I do not believe I deserve any such credit. If anything, please list Scrapkit by, (assuming you didn't add other bit by a different designer to your tag of course). I'd prefer not be given credit for simply assembling the cluster frame. Thank you ♥
Followers
Saturday, August 15, 2020


• You should have a total of 4 layers now of your 'background' - one regular, one mirrored, one with screen effect, and one motion blurred.
• Remember your tube? Well let's paste it in for a few overlay effects. I pasted it again, this time only sizing down by 80%, put one on one of the sides then duplicate and mirror it. I then applied blend mode of Burn at 34%
• Now! Remember that main tube layer you pasted right at the start? Duplicate her and move it below the main tube you'll have. Apply a Gaussian Blur of about 10. (Adjust > Blur > Gaussian Blur in X5, should be similar in other versions).
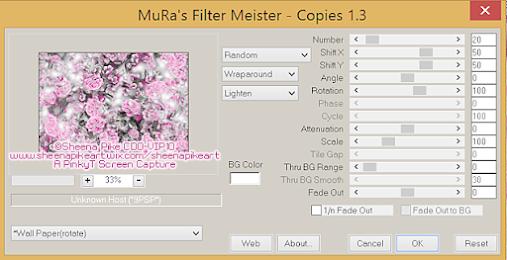
• On the blurred tube copy, we are going to apply Feedback effect - Effects > Reflection Effects > Feedback and apply the following settings.
• Drag the effect all the way over to the right side of your canvas, make sure this layer is underneath your main tube layer on top. Duplicate it and mirror, merge down so they are on the same layer. Change the blend mode to Screen, leave at 100%
• Duplicate the layer and change blend mode to Soft Light, or whatever you think looks good.
• Almost done I promise! Come on you can do this!
• Remember those 4 layers of the background? Select all of them, click the Link button on your layer palette, like so and press it:
• Go to Layers > View > Show Link Set - this enables you to grab ONLY the layers you want to see, and you should now see your background effect, no tube, just effect. Go to Edit > Copy Special > Copy Merged.
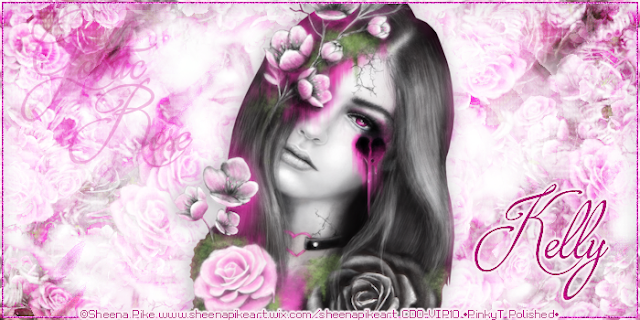
• Now click undo until you see everything again after you have your copy merged grouping, paste that layer above the copy of the tubes you put above the ones that were on the sides. Apply Staci's mask that I used (or any to your liking really). I applied Overlay blend mode to it.
• On top of ALL of your other layers, including the tube, paste the copy merged again. Select All, contract by 2 and hit delete.
• Under this layer, add a solid color with your flood fill tool, I chose a darker color from my tube. Select all, contract by 4 and hit delete, select none. On this layer, go to Effects > Edge Effects > Enhance More. I also applied DSB Flux Bright Noise to this because I like sparkles LOL. I chose Mix option and a higher number, mine was at 65.
• If you wish, I also added a blank layer above the mask, grabbed my brush tool and added a texturey brush, using a darker color from my tube, not needed but it added a smidgen of darker effect for my background. I put the blend mode at Overlay.
• Add drop shadow to your tube and the frame layer you made.
• Add legible credits so they are readable at first glance.
• Add any text or wording that you wish at this point.
• Save and you are DONE!!!!
I hope you have enjoyed this tutorial and I didn't confuse you tooooooo much. I love my blend modes as you can tell, you can add so much depth with them!

Subscribe to:
Post Comments
(Atom)
Labels
- CDO (1346)
- Wallpapers (756)
- Timeline Set (395)
- CDO Bonus Tube (264)
- Dees'Sign Depot (231)
- Ladyhawwk Designs (226)
- Verymany (174)
- Tasha's Playground (138)
- Chichi Designz (135)
- CDO CT (130)
- Barbara Jensen (126)
- Foxys Designz (126)
- FTU Cluster Frames (120)
- Snag Sets (118)
- Hungry Hill (117)
- Honored Scraps (107)
- Rebel Dezigns (106)
- CDO Scrap CT (87)
- Gimptastic Scraps (82)
- Animated (72)
- Karmalized Scraps (72)
- Rebecca Sinz (62)
- Gothic Inspirations (56)
- Freebie (55)
- Chaos Priestess (54)
- CDO Scrapkit Bundles (52)
- Kissing Kate (46)
- Rieneke Designs (43)
- PTU Tutorials (42)
- Gradients (36)
- PTU Clusters (34)
- Zindy Nielsen (32)
- Templates (29)
- A Space Between (25)
- CDO Retired Bonus (25)
- Mystical Scraps (24)
- Creative Scraps by Crys (23)
- FTU Tutorials (22)
- CDO Collab Kits (20)
- Keith Garvey (20)
- Masks (20)
- Kizzed by Kelz (19)
- CDO Diamond Club (17)
- Forum Set (15)
- Scrappin' Krazy Designs (12)
- Doodle by Design (11)
- Schnegge Scraps (11)
- Special Note (11)
- AoRK (10)
- Birthstone Series (10)
- Monti's Scraps (10)
- Christmas (9)
- Treasured Scraps (9)
- No Scraps Tutorials (8)
- Whisprd Dreamz (8)
- Zlata M (8)
- CDO Scrap Collab (7)
- Digital Art Heaven (7)
- Pink Paradox Productions (7)
- CT Collabs (6)
- Dark Yarrow (6)
- Sophisticat Simone (6)
- TK Dezigns (6)
- Layouts (5)
- Textures (5)
- CDO Exclusive Tube (4)
- Creative Misfits (4)
- Irish Princess Designs (4)
- LML Designs (4)
- Curious Creative Dreams (3)
- Dance in the Rain (3)
- Freeks Creations (3)
- Raspberry Road (3)
- Awards (2)
- CDO Cluster Packs (2)
- Mellie's Beans (2)
- Scrapkits (2)
- Thank You! (2)
- Wicked Princess Scraps (2)
- sylly creationz (2)
- 'how to' tutorials (1)
- Blinkies (1)
- CDO Animation Collab (1)
- TOU (1)
Leave Some Lovin'
Search This Blog
Blog Archive
-
▼
2020
(187)
- ► November 2020 (19)
- ► October 2020 (17)
- ► September 2020 (26)
-
▼
August 2020
(19)
- • Autumn's Fire •
- • Autumn's Smile •
- • Believe in your Dreams •
- • Hello Fall Y'all •
- • Lady Blue •
- • Fantasy Dream •
- • Chocolate Seduction •
- • Gothic Rose Tutorial •
- • Animal Kingdom •
- • Sea Nymph •
- • Dark Secrets •
- • In My Heart •
- • Starting Today •
- • Forever in My Heart •
- • Let Love Sparkle •
- • Love Yourself •
- • No Whining •
- • La Di Da •
- • Your Vibe •
- ► April 2020 (14)
- ► March 2020 (22)
- ► February 2020 (18)
- ► January 2020 (15)
-
►
2019
(178)
- ► December 2019 (17)
- ► November 2019 (20)
- ► October 2019 (10)
- ► September 2019 (15)
- ► August 2019 (8)
- ► April 2019 (18)
- ► March 2019 (16)
- ► February 2019 (13)
- ► January 2019 (18)
-
►
2018
(263)
- ► December 2018 (16)
- ► November 2018 (27)
- ► October 2018 (22)
- ► September 2018 (17)
- ► August 2018 (19)
- ► April 2018 (23)
- ► March 2018 (28)
- ► February 2018 (21)
- ► January 2018 (24)
-
►
2017
(253)
- ► December 2017 (11)
- ► November 2017 (16)
- ► October 2017 (23)
- ► September 2017 (15)
- ► August 2017 (22)
- ► April 2017 (28)
- ► March 2017 (21)
- ► February 2017 (33)
- ► January 2017 (25)
-
►
2016
(342)
- ► December 2016 (28)
- ► November 2016 (27)
- ► October 2016 (30)
- ► September 2016 (23)
- ► August 2016 (25)
- ► April 2016 (31)
- ► March 2016 (27)
- ► February 2016 (32)
- ► January 2016 (29)
-
►
2015
(362)
- ► December 2015 (35)
- ► November 2015 (43)
- ► October 2015 (29)
- ► September 2015 (27)
- ► August 2015 (34)
- ► April 2015 (31)
- ► March 2015 (31)
- ► February 2015 (22)
- ► January 2015 (25)
-
►
2014
(150)
- ► December 2014 (18)
- ► November 2014 (20)
- ► October 2014 (14)
- ► September 2014 (10)
- ► August 2014 (11)
- ► April 2014 (12)
- ► March 2014 (13)
- ► February 2014 (14)
- ► January 2014 (8)
-
►
2013
(37)
- ► December 2013 (3)
- ► November 2013 (6)
- ► October 2013 (3)
- ► September 2013 (2)
- ► August 2013 (4)
- ► April 2013 (1)
- ► February 2013 (2)
- ► January 2013 (4)
-
►
2012
(8)
- ► December 2012 (2)
- ► October 2012 (1)
- ► March 2012 (1)
- ► February 2012 (2)
- ► January 2012 (1)
-
►
2011
(20)
- ► December 2011 (4)
- ► November 2011 (2)
- ► April 2011 (1)
- ► March 2011 (3)
- ► February 2011 (2)
- ► January 2011 (3)
-
►
2010
(42)
- ► November 2010 (1)
- ► October 2010 (1)
- ► September 2010 (5)
- ► August 2010 (2)
- ► April 2010 (3)
- ► March 2010 (4)
- ► February 2010 (5)
- ► January 2010 (16)
-
►
2009
(23)
- ► December 2009 (8)
- ► November 2009 (4)
- ► October 2009 (11)


0 comments:
Post a Comment