About Me
- Tonya
- Hiya I'm Tonya! I'm an avid psper, have been for a few years and finally have me a blog that I've been working on slowly getting stuff added to. I started writing tuts and recently started making masks and templates. I LOVE to see creations you've made with my things, if you'd like to email me please do so at aquaspinner@gmail.com ................................................. My TOU are as follows: All of my items are personal use only NO Commercial Use, please do not share (distribute) my stuff in groups, just send people here to grab please. ♥ Tutorial writers, if you wish to use my stuff in your tutorials, of course I am honored! You're more than welcome to use my stuff in them, I only require that you link to me and send people here to grab the goodies that you are using in the tut. ................................................. Hope you'll enjoy what I have for ya and thanks for stopping by. ♥
My Artist CTs ♥

My CTs ♥



My Guest CTs ♥

Sunday, January 31, 2010

This is the tag we'll be making and what you'll need:
• San Valentin scrapkit by Lizquis Scraps, please leave some love if you download!
• I used a tube of Elias Chatzoudis' which I purchased and is available for purchase at My PSP Tubes. Please do not use this tube if you do not have appropriate license to do so.
• I used a mask from the Creative Misfits blog, the one I chose to use was heartmask.
• I used Toadies What Are You, Filters Unlimited 2, Super Blade Pro, Eye Candy 4 Gradient Glow, Eye Candy 5 Perspective Shadow, and Xero Porcelain. Whew! That's it, I do love my filters lol.
• Animation Shop if you choose to animate.
• Font I used was MC Sweetie Hearts which you can get at DaFont.
Okay ready, let's go make a really easy scrappy tag!
• Open up a new canvas, I used 700x700 with a white background so there was lots of space to work and see what we are doing. I opened up element marco_sv3 and pasted on canvas as a new layer, re-size to your liking (I did mine at 85%). Click inside the frame with your magic wand tool and expand selections by 15 or whatever number you like. On your white background layer, add a new layer and paste a paper of choice into selection on that new layer. I used paper 7. Select none.
• On white background layer, select all, add a new layer and paste paper of choice into selection on the new layer (I used paper 4). Select none and apply heartmask and merge layer group. Using your deform tool, and maximize your image you are working on I pulled the mask layer up some so that we can see more of the mask effect on top of the frame. I also pulled both of the sides in so it looked more closer to the shape of the frame. I re-sized my mask layer by 95% (that layer only, make sure you have unchecked re-size all layers in that box). Duplicate the masked layer, and move that duplicate below the original and apply Toadies What Are You filter (I just used the default settings of 20). Voila doesn't that look purdy?
• Alright now lets get our tube in there. I used a lovely Elias tube cuz well I just loveeeeee Elias' art lol and this matched well with the kit. Anywhoo take your tube of choice and paste on top of frame, re-size the tube to your liking. After you have situated how you want, on the frame layer, select all, float, defloat, and contract selections by 1. Grab your eraser tool and on the tube layer, erase any bits of the tube that hang over onto the frame that you don't want appearing. When done, select none and on mine some of the tube was still over the bottom of the frame so I just carefully erased that part.
• At this point I did my cropping and re-sizing that I wanted, and sharpen any layers that needed it. On my tube layer, I sharpened and then applied Xero Porcelain two times. (LOL I know you're wondering why twice, I just thought it looked like it need more glow that's all). Add any elements of choice. I used dec_alas and re-sized placing at top of heart but behind the tube layer and also dec_corazon_sv6 as well. Re-size as appropriate. That's about all I used for elements, I know it's pretty basic but sometimes that works lol. Add any drop shadows at this point, I used Eye Candy 5 Perspective Shadow for that but if you don't have the filter you can easily use drop shadow within PSP too.
• Add the artist's copyright and your taggers watermark. I always do this step after re-sizing so that the copyright information is most clear. Grab your text tool and let's add your text now too. I used the font MC Sweetie Hearts with colors of white and I applied Super Blade Pro a lovely gelly pink setting, then applied Eye Candy 4 Gradient Glow, and a blurry drop shadow, use settings of whatever are your favorites.
• I decided to animate! Duplicate those angel wings layer twice so you have a total of 3 layers. I chose to use a noise filter that comes with Filters Unlimited 2, called Add Noise (RGB) which is under Noise Filters, I like this one because it adds a bit of colorful sparkle, something just a wee bit different than DSB Flux one. Okay on one of the angel wings layers, (hiding the other two), I used the default which comes up on mine as 88. Hide that layer, and unhide the middle angel wings layer, repeat the plugin again, this time I used a setting of 84. Hide the middle layer, and unhide the 3rd layer of the angel wings that does not have a filter effect on them and apply the filter again using a setting of 80.
• Okay now that we got our tag done and our layers, for the animation, all we have to do is actually animate it. What I do, is make sure you have 2 of the angel wings layers hidden and all other layers visible, including the white background layer. I know some cringe at the white background layer but with Animation Shop if I have any sort of partial transparency it turns very bad so me and AS agreed if I used a white background it would play nice with me. Okay so with 2 of those layers hidden, right click in the title bar of your image, and choose Copy Merged. Over in Animation Shop, paste as a new animation. Go back to PSP, hide that angel wings layer, and unhide the 2nd one, do a Copy Merged again, and over in AS, paste after current (it should be a button in your toolbar). Repeat this process for the 3rd layer of the angel wings. Okay now I just do my optimization wizard, play my animation and save as a GIF.
• That's it! I hope you've enjoyed this tutorial!
This tutorial was written by Tonya on January 31, 2010 and absolutely no part of this tutorial may be taken or used without my express permission. Any similarities to any other tutorial is purely coincidental.
Woohooo I done a new scrapkit with a challenge at Creative Misfits. Here is a preview of what I done, now I must confess........... I'm no good at previews lmao and I think it didn't really do the kit justice. So go forth and create and if you'd like to show me what you created with it, I'd sure love to see it!

There are lots of awesome kits over there, please leave some love if you download! Click HERE to go get it.

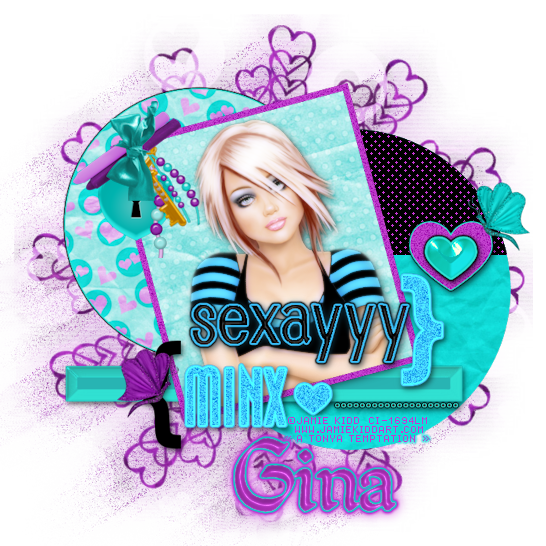
• Tube I used were by Jamie Kidd and available for purchase at CILM and may only be used with appropriate license, please do not use this tube if you do not have a license to do so. CILM is now closed, you can now purchase her tubes at CDO here.
• Mask I used was from Creative Misfits blog, you can get it here I used heartmask3byjenny.
• I used the scrapkit Vivid Crush by the fabulous Gina which is available for sale at Scraps with Attitude.
• Template I used was one by Missy of Divine Intentionz, I used template 285.
• I love filters lol, so here's what I used: Super Blade Pro (coconut ice setting), Mura Meisters, Tone, Eye Candy 4 Gradient Glow, Eye Candy 5 Perspective Shadow, Xero Porcelain, VM Natural Speed.
• Font used was Quill Perpendicular Regular, but use whatever font you wish.
Okay ready, let's go, this will be fun (it looks long but I like to be descriptive)
• Open up Missy's template, duplicate and close out original, delete the credits layer. Change the canvas size to 700 x 700 and unhide the bottom background layer, flood fill white if necessary. Gives us lots of room to work with and enables us to see what we're doing easier. Okay let's work on the template from the bottom up:
♦ Large circle: Select all, float, defloat, add a new layer, and paste paper of choice into selection on the new layer. I used paper 32 for this one.
♦ Shape 1: I changed the color of this to black by flood filling with the black color of choice. On this layer I also applied Mura Meisters Tone filter. Now a little trick I did, select all, float, defloat, and then apply the filter. I changed the background and foreground to a purple color in the kit, the rest were all the default settings in the filter.
♦ Glittered Heart: I changed the color of this to a purple from the kit by using my manual color correction tool. Here are the settings I used:

I also applied Eye Candy 4 Gradient Glow to the glittered heart, just to give it some more definition.
♦ Heart: I changed the color of this to a color in my tube, using the manual color correction tool, just like above by with the source color being the pink the heart already is and target the color of choice. After you're happy with your choice, select all, float, and defloat, and apply Super Blade Pro coconut ice setting to give a nice glassy effect.
♦ Thin Rectangle: Do the same steps as you did for the Heart layer.
♦ Dotted Line: Add a new layer, and flood fill black. On the original dotted line layer, select all, float, defloat, invert selections, and on the black flood filled layer, hit delete. Select none and delete the original dotted line layer. On the new layer of the black dots you now have, I applied a nice gelly inner bevel setting and then applied an Eye Candy 4 Gradient Glow setting. I created one just for this tag based on the colors of the tag, using the blue/teal and black colors.
♦ Circle: Select all, float, defloat, add a new layer, and paste paper of choice into selection on new layer, I used paper 6 for this one. Select none and delete the original circle layer. I applied gradient glow setting to the new circle layer we just created.
♦ Frame Background: Paste a paper of choice as a new layer (I used paper 20), and re-size paper as appropriate, I re-sized by about 70% and then rotate the single layer by 15° to the left if you like. On the original frame background layer, select all, float, defloat, invert selections, and on new paper layer you just took care of press delete. Select none and delete original frame background layer.
♦ Glittered Frame: Repeat same steps as with the Glittered heart layer (turning it to a purple colors in the kit).
♦ Wordart by Missy: Okay I used manual color correction tool and using one of the pink colors in that wordart as the source, I used a blue color in the tube I used as the target. This changed all the pink colors to blue/teal to match the rest very nicely. We're not quite done yet though. With your magic wand tool, carefully click in each of the letters of the word sexayyy. (If you need to hide other layers if it helps you see things better.) After you have each of the letters selected, I applied a nice gelly inner bevel to mine, leave selected, and applied my Eye Candy 4 Gradient Glow setting. On the other ones I had used a width of 3 but this one I changed to 5, play around with whatever you like best though.
• Alright! That's it for the template, looks beautimous doesn't it? Now lets go add that tube in there. I used a beautiful tube of Jamie Kidd's I've been meaning to use for ages lol. I pasted above the frame background but below the glittered frame layer, re-sized a little bit and rotated to the left by 15°. Looks good?
• On white background layer, select all, add a new layer and paste paper of choice into that new layer, I used paper 31. Apply mask to this layer and merge layer group if happy. I re-sized the layer by 95% and duplicated the layer, bringing the duplicate under the original. On the duplicate layer, apply VM Natural Speed using the default settings. It's possible that the effect got just a smidge too close to the edges. If you are not happy with that, use your smudge tool to push in the bits and do any correcting you like. Other option is before you apply the filter you can increase your canvas size again too.
• Add elements of choice to your kit now. I made a cluster with one of the padlock hearts, a key, and a pretty crayon and bow. There are loads of great elements in this kit! This is where you can make the tag unique to you.
• Re-size the tag to your final tag size, and sharpen parts that need it, especially the tube. At this point, I duplicated the tube, bringing the duplicate beneath the original, applying a gaussian blur of 1 and also the filter of Xero Porcelain. On the original tube, I applied Xero Porcelain there too and changed the overlay mode to Screen. I also applied Eye Candy 5 Perspective Shadow to both layers. Apply the Perspective Shadow to all layers that need it at this time.
• Add the artist's copyright and your taggers watermark so that they are clear. I always do this after re-sizing so that the information doesn't lose any clarity to it. All that is left is to do the text, I chose to use Quill Perpendicular font and applied an inner bevel and a gradient glow setting of choice, I used a different one than before, I just kind of switched the colors around so that the blue/teal contrasted nicely with the purple in the text, and then of course a drop shadow.
Woot! That's it we're all done. I know this looked long but I hope you hung in there and enjoyed the tutorial.
This tutorial was written by Tonya on January 30, 2010, absolutely no part of this tutorial may be taken or used without my express permission. Any part that may be similar to any tutorial is purely coincidental and unintended.
Wednesday, January 27, 2010


This is the tag we'll be making and what you'll need:
• A Softer Look at Love scrapkit made by the very talented QueenBrat it is available for purchase at her store.
• I used a tube I had purchased of Maxine Gadd's which I purchased at My PSP Tubes. Please do not use this artist's work without a proper license to do so.
• Template I used was by Missy of Divine Intentionz, I used template 40.
• I used a mask from Creative Misfits blog, please check out the masks there, they are awesome!
• Filters I used were Xero Porcelain, Eye Candy Gradient Glow, Super Blade Pro (coconut ice setting), and Eye Candy 5 Perspective Shadow.
• Font used was Constanza which I cannot share, but any scripty font will work nicely.
Okay ready, let's go, this will be fun I promise!
• Open up Missy's fab template and duplicate, close out the original, deleting the credits layer. Change the canvas size to 600 x 600, we can re-size later if needed. Flood fill the background layer with white, it makes it easier to see what we are doing. Okay let's work from the bottom up on the template by doing the following:
♦ Larger Circle: select all, float, defloat, add a new layer and paste paper of choice into selection on new layer. Select none and delete the original layer. I used paper 2 and because the tube I used was a bit on the purple/mauve side, I used my manual color correction tool and change the tone of the paper to match the tube.
♦ Small Circle: I did everything the same as with larger circle except I used paper 7 and again used my manual color correction tool to change the tone to match my tube.
♦ Larger Heart: Select all, float, defloat, add new layer and paste paper of choice into selection on new layer. I used paper 13 on this one. Select none and delete original larger heart layer.
♦ Smaller Heart: Repeat same steps as with Larger Heart, I used paper 15.
♦ Dotted Line Heart: Add a new layer and flood fill that layer with a color of choice, I used a purple color from one of the papers. On the Dotted Line Heart layer, select all, float, defloat, invert selections and on the flood filled purple layer select delete. Delete original Dotted Line Heart layer. Apply an inner bevel of choice to the new layer, I also applied Eye Candy 5 Perspective Shadow.
♦ Small Hearts: Add a new blank layer and flood fill with purple color again. On original layer, select all, float, defloat and invert selection, press delete and select none. Delete the original Small Hearts layer. On the layer you just created, select all, float, defloat, apply Super Blade Pro (coconut ice setting). I used the 3rd shape from the top but use whatever shape setting you like best in the filter.
• Okay then it's starting to look really purdy right? Now let's put our tube in there. Under the small hearts layer, paste tube of choice as a new layer, and re-size as needed. On the smaller heart (the one that has a cream color tone in my tag), select all, float, defloat, invert selections. On the tube layer, erase any parts that hang over the edge you don't want showing.
• I applied a slight gradient glow to each of the circle and hearts layers, use whatever colors and preferences you think looks good. On the white background layer, select all, add a new layer and paste paper of choice into selection on new layer. Apply mask of choice, I used the one called "heartmask" in the pack of masks I linked you to above. Merge layer group. If you wish to, you can use your manual color correction tool to adjust the color to match your tag the best. I used my deform tool to make the mask fit best to the tag.
• Add elements of choice from the fabulous kit. See my tag just as a guide, make the tag your own, there is a ton of beautiful elements in the kit for you to choose from. On a couple of the elements I did use my manual color correction tool to match up close to the rest of the tag. I applied drop shadows as necessary to the various layer. Do any cropping you need at this point and re-size if you wish. I sharpened and applied Xero Porcelain to the tube. Add the artist's copyright and your taggers watermark.
• All that's left is the text! I used font Constanza and applied a nice inner bevel and gradient glow with a drop shadow, rotating it to fit into the tag of the Love Note element I used. If needed use your deform tool to adjust.
Okay that's it! I hope that you've enjoyed this tutorial ♥
This tutorial was written by Tonya on January 27, 2010 and absolutely no part of this tutorial may be taken or used without my express permission. Any similarities to any other tutorial is purely coincidental.
Sunday, January 24, 2010


This is the tag we'll be making and what you'll need:
• Oh My Heart scrapkit made by LaCarolita available for download. If you choose to download this kit, please 'leave some love' on her 4shared in appreciation.
• I used a mask from Weescotslass mask 352, please leave some love if you download.
• Tube I used was by Barbara Jensen which is available for purchase through her site, any tube that you wish to use will do though. Please do not use the tube I used without a proper license to do so.
• Template I used was by Missy of Divine Intentionz, the one I used was template 326. Please leave some love if you download.
• I used a lot of filters in this one lol, I used Super Blade Pro (coconut ice setting), Eye Candy 4 Glass, Eye Candy 4 Gradient Glow, Eye Candy 5 Perspective Shadow, Xero Porcelian, DSB Flux Bright Noise, and VM Extravaganza Holidays in Egypt. Whew! I do love my filters LOL.
• Fonts used were Kayleigh and Lesline, but any font will do.
Okay ready, set............ TAG (this looks long but really it isn't)!
• Open up Missy's beautiful template, duplicate and close out original. Change the canvas size to 700x700 so we have lots of space to work. Unhide the bottom background layer and flood fill white. Delete the following layers: by Missy (© layer), wordart by Missy, glittered heart 2, glittered heart, rectangle2, and rectangle1.
Alright let's start from the bottom up, here are the step I did as the layers are, one of the beautiful things of Missy's templates is that she has them 72dpi so if you use a PTU no worries on that part.
♦ Medium Circle: 1 & 2 = leave as is
♦ Thin Rectagle: select all, float, defloat and flood fill with a red of choice and apply Super Blade Pro coconut ice. On mine it turned a bit lighter than I wanted so I used my manual color correction tool and it darkened it up beautifully
♦ Small Heart 3, 2, & 1: Merged down so those 3 layers are all one layer, select all, float, & defloat and flood fill with the color black. Select none, and apply DSB Flux Bright Noise, I clicked on Mix once and with a number of 62
♦ Circle 1 layer: Select all, float, and defloat, flood fill with color black and apply DSB Flux Bright Noise, same setting as before
♦ Circle 2 layer: Select all, float, and defloat, add a new layer and paste paper of choice (I used paper 7 from LaCarolita's beautiful kit) into selection on new layer. Select none and delete original Circle 2 layer
♦ Dotted Circle: Leave as is
♦ Circle 3: Select all, float, defloat and flood fill with black
♦ Circle 4: Select all, float, defloat and flood fill with a dark red color of choice, I used a color from the paper that I added in place of Circle 2 above.
♦ Small Glittered Circle 1 & 2: On each of these layers, select all, float, defloat and flood fill with a red color of choice. Select none, and apply DSB Flux Bright Noise with same settings as above
♦ Small Circle 1 & 2: Select all, float, defloat and flood fill with black on each of the layers, select none
♦ Heart 1 & 2: Select all, float, defloat, and flood fill with red color of choice and then apply Super Blade Pro coconut ice setting as before with the Thin Rectangle layer. Here I also used my manual color correction tool to fine tune to the red color of choice.
• Okay that's it for the template layers, it's starting to look purdy I hope? Go back down to the white background layer and select all, add a new layer, and paste into the selection on the new layer a paper of choice, I used paper 7 again. Select none and apply mask 352 from weescotslass, and if happy with placement and everything, merge layer group.
• Now let's add some effects and stuff. On medium circles 1 & 2, I applied Eye Candy 4 Gradient Glow of my own making. I had the setting be some red with black on the outside, just play around with whatever you think looks good for your tag. I did the same thing with the thin rectangle and hearts 1 & 2, but of course had to reverse those colors in my gradient glow settings. On the Circle 4 layer, I applied VM Extravaganza Holidays in Egypt, I modified the default settings by choosing size of 45 and mode left at 0.
• Okay let's add the tube in there! On Circle 4 layer, paste tube as a new layer and adjust and re-size as needed to your preference. Now on the tube I used, she hung over the bottom a little so on the Circle 4 layer, I did select all, float, defloat, invert selections. Then on the tube layer, grabbed the eraser tool and erased the bits that hung over so looks all nice and perfectly set in there.
• At this point, I re-sized the entire tag to the ending size I wanted, sharpening any layers that need it. On top of the hearts layer I just put the text Love and Me on each using font Kayleigh. The effects I used on that text was a nice gelly inner bevel setting, Eye Candy 4 Glass (a nice clear setting), Eye Candy 4 Gradient Glow, and Eye Candy 5 Perspective Shadow. I applied Xero Porcelain to the tube, added elements of choice and applied Perspective Shadow to any parts that needed a drop shadow.
• Only thing left was to add artist's copyright and your taggers watermark. I always do this after all re-sizing is done so the © is as clear as possible. I used font Lesline for the text and for effects on this one I did an inner bevel, Eye Candy 4 Gradient Glow of choosing, and a drop shadow.
That's it! Woohoooo! I know it was a little fiddly but nice result in the end. I hope you've enjoyed my tutorial.
This tutorial was written by Tonya on January 24, 2010 and absolutely no part of this tutorial may be taken or used without my express permission.
Wednesday, January 20, 2010


This is the tag we'll be making, another nice easy scrappy tag. So, here's what you'll need:
• I used the scrapkit That's Amour by the very talented Stina please go to her blog to check out her stores. Click here to go to Stina's Blog.
• Mask I used was by Vix, you can get it here under the Goodies section, I used mask 320, all her masks there are fab!
• The filters I used were Toadies What Are You, Xero Porcelain, Xero Mistifier, Eye Candy 5 Perspective Shadow, and Eye Candy 4 Gradient Glow.
• Pretty brush of choice.
• Font used was Goldy's Valentine, but use whatever font you wish.
Okay ready, let's go this is an easy tag that is just stunning in the end!
• Open a new image with a white background 700 x 700. I like to start big so I have lots of room to work around in. Paste frame of choice (I used Knotted Heart 02) as a new layer, re-sizing as appropriate. Click inside frame with magic wand and expand by about 10. Underneath the frame add a new layer and paste paper of choice (I used paper 27) into selection on new blank layer.
• On white background layer, select all, add a new layer and paste paper of choice as a new layer (I used paper 25). Apply Vix' pretty mask and merge layer groups. Duplicate and move copy below mask and apply Toadies What Are You (default settings) to that copy. On original masked layer, I changed opacity to about 48.
• Okay now here is the sequence of adding of elements, use whatever you like, this kit is HUGE and offers sooooo many options. I added Glitter Spill 1 above masked layer, but below the paper inside the heart frame. Looks purdy? Good let's continue on. On the paper layer, select all, float, defloat, add a new layer and use brush of choice on that new layer. I used a pretty floral one with a red from the poser tube I used from the kit. With having it selected on just the paper, you will only apply the brush inside there.
• Above heart frame, I pasted wire heart 2, re-size as needed. Move to the left hand side of tag (see mine for placement ideas if you like). Paste dove heart 2 next, re-size as needed. Paste Sparkles 2 as a new layer, then the rest of the elements as you like, again re-sizing as you go so you know what looks good. Use my tag to give you ideas but make it your own!
• Now I opened up the clouds element and used the manual color correction tool to color the clouds as I wanted to match them up closer to the tag. I chose one of the main blues in the clouds as the source color and the target to be a lighter red from the masked layers. You may need to play around and try a few to get what you like. Paste onto tag as a new layer, re-size as needed and then I duplicated and mirrored them so it gave more cloud cover to speak.
• Using one of the many available wordarts, I pasted as a new layer and lined up on the clouds. I applied/created a gradient glow through Eye Candy 4 to give it more definition. Now make sure to add your tube in. I used one of the posers in the kit, it just fit so well this time, no need to waste time looking through all my tubes lol. Re-size as you like.
• At this point, I re-sized my tag to my ended tag size, sharpening whatever layers need it and applying drop shadows so it looks all nice. I used Eye Candy 5 Perspective Shadow, but if you don't have the filter, you can achieve same effect with drop shadow within psp. On the tube, I applied Xero Porcelain and then Xero Mistifier (both using default settings) gave her a nice muted glow.
• All that's left is to add the copyright information. In my tag, as per the TOU file with the kit, gave credit to the poser maker and noted kit was by Stina and then my taggers watermark. Add your text, I used Goldy's Valentine size 48 and applied an inner bevel, applied same setting of gradient glow as created earlier, and a nice blurry drop shadow. Then I rotated the text 70° to the left and placed on the tag element. Hide white background layer and save as a png and voila you're done!
I hope you've enjoyed this tutorial, told ya it was an easy one ♥
This tutorial was written by Tonya on January 19, 2010, absolutely no part of this tutorial may be taken or used without my express permission. Any part that may be similar to any tutorial is purely coincidental and unintended.
Tuesday, January 19, 2010


This is the tag we'll be making, another nice easy scrappy tag. So, here's what you'll need:
• I used the scrapkit Devilish Love by the very talented Jules of Jules Junk which is available for sale at Scraps with Attitude.
• Tube I used was by Elias Chatzoudis and can only be used with a license which can be obtained at My PSP Tubes however any tube you want to use will do.
• I used 2 masks by Vix (#108 & 326) and you can get them at her site under the Goodies section.
• The filters I used were Mura Meisters Tone, Xero Mistifier, Eye Candy 5 Perspective Shadow, and Eye Candy 4 Gradient Glow.
• Font used was Liorah BT, but use whatever font you wish.
This is quick and easy I promise!
• Open up image 700x700 and paste frame of choice as a new layer, I used frame labeled element 35, re-size as needed, remembering this is a full-sized kit so more re-sizing may be necessary. Click inside the heart frame and expand selections by about 10, add a new layer below the frame and paste paper of choice into new layer selection, I used paper 2. On this layer (with everything still selected) I applied Mura Mesiters Tone to the paper, making sure that black was my foreground color). Once applied, select none.
• Okay now let's put tube in there, I used one of Elias' beauties, and pasted tube above that paper layer we just added but below the frame. Re-size the tube if needed. On tube layer, select all, float, and defloat, go to the frame layer, grab your eraser tool and and erase the parts of the tube that hang over the top part. This will make it look like she is coming out of the heart frame. Select none. Depending on your tube, it may be necessary to remove any excess on the bottom too, just carefully erase those bits.
• On white background layer, paste paper of choice as a new layer (I used paper 9), and paste it twice as we are using 2 different masks here, but hide one of them, this will allow us to see better what we are doing. On the bottom most one, apply mask 108 and merge layer group. On mine I used my deform tool to pull at the masked layer until I had it just right. Once happy go to the second paper and unhide, apply mask 326 and merger layer group. I re-sized this layer about 87% and moved it so it was more centered in the tag. Beautimous!
• At this point I re-sized my tag, sharpening my tube layer of course. At this point add some of the gorgeous elements that Jules provides. Now on the wordart piece, I used my freehand selection tool to make 2 layers of the 2 words, widened the space and put the heart element in the middle, lining them up how I wanted and then merged the heart element and the 2 words back into 1 single layer. Add a nice drop shadow to layers that need them, I used Eye Candy 5 Perspective Shadow. On the tube layer, I applied Xero Mistifier to give the tube a nice muted glow.
• Add the artist's copyright and your taggers watermark and then add your text. I chose to use Liorah BT but use whatever is your font of choice here.
This tutorial was written by Tonya on January 18, 2010, absolutely no part of this tutorial may be taken or used without my express permission. Any part that may be similar to any tutorial is purely coincidental and unintended.
Subscribe to:
Posts
(Atom)
Grab My Blinkie
